What is Z-Image-Turbo? The 6B Ultra-Fast Text-to-Image Model Explained
Hey, guys. I’m Dora. That day, I ran into Z-Image-Turbo after a small snag: I needed clean, readable text inside an image, and my usual setup kept giving me squiggly letters. Not unusable, but always a little off, like a sign painted in a hurry. I kept seeing notes about a model that handled text natively and ran on a 16GB card without drama. So last week (Feb 2026), I tried Z-Image-Turbo on my own machine and through an API. The short version: it’s fast, it’s practical, and it doesn’t try to be a spectacle. That combination made me pay attention.
What is Z-Image-Turbo?
 Z-Image-Turbo is a 6B-parameter, open-source image generation model built for quick iteration and readable text rendering. It targets the sweet spot a lot of us actually need, good enough visuals, reliable typography, and a setup that doesn’t force a full workstation. It supports bilingual prompts (English and Chinese), and it’s tuned for short sampling schedules, which is how it keeps latency low.
I tested it both locally and via a hosted endpoint. Locally, it ran on a 16GB GPU without device juggling. Through the API, I could push single images at a steady per-image rate without worrying about batch tuning. It’s not trying to out-dream the most cinematic models: it’s trying to get you a solid image with readable words, fast.
The 6B Parameter Architecture
I don’t pick models by parameter count, but it explains some of the behavior. At 6B, Z-Image-Turbo feels intentionally constrained: lighter than the giant diffusion variants, heavier than the smallest mobile-first ones. In practice, that meant two things for me. First, memory stayed predictable, no late-stage OOM when I nudged resolution. Second, prompts responded consistently. I didn’t have to over-engineer guidance to keep typography intact.
The architecture detail that mattered most: it’s trained to treat text-in-image as a first-class goal, not a happy accident. You can tell when you ask for signage, UI mockups, or product shots with labels. The letters don’t melt as soon as you add style. They’re not perfect, but they’re stable enough that I stopped babysitting the prompt.
8-Step Sampling, Why It’s So Fast
 Most of my generations landed between 6–10 steps, with 8 as the default. That’s where the speed shows up. Low-step schedules often fall apart on fine detail, but here the outputs held shape, and the text stayed legible more often than not. On my 16GB laptop GPU, 512×512 images routinely finished in a couple of seconds: on the hosted API, latency stayed snappy even with light concurrency.
This didn’t save me time at first, I still fussed with prompt phrasing. But after a few runs, I noticed the mental load drop. Fewer retries. Fewer “one more seed impulses. If you work in short loops (draft → tweak → ship), the short step count adds up quickly.
Key Features That Matter
I try to avoid feature lists, but a few choices here shaped how I used the model.
Bilingual Prompt Support (EN/ZH)
I tested English and simple Chinese prompts side-by-side, labels, signage, short captions. The model handled both without me switching anything in settings. What stood out was prompt intent carrying over across languages. When I asked for “a clean menu board with three sections” in Chinese, it gave me the same structure as the English prompt, not a loose reinterpretation. If you work across teams or markets, this reduces friction, no extra fine-tuning, no language-specific hacks.
Limits: mixed-language prompts inside a single image sometimes tipped toward one language for the rendered text. I could steer it with explicit instructions (e.g., “title in EN, subtitle in ZH”), but it isn’t perfect. Still, for bilingual workflows, it’s one of the more straightforward experiences I’ve had.
Native Text Rendering in Images
 This is the reason I stayed. Text looks like text most of the time, straight baselines, recognizable fonts, and characters that survive mild style changes. I threw common failure cases at it: curved signage, small footers, faux-UI labels. It held up better than the usual open models I use, especially at modest sizes. Not magazine-cover typography, but good enough that I stopped masking and compositing every time.
A small practical note: short, precise text prompts worked best. Long paragraphs still blur. If you’re designing heavy copy into an image, you’ll likely still want a layout tool. But for logos, tags, banners, and simple UI mockups, Z-Image-Turbo made the “just render it here” path viable.
16GB VRAM Compatibility
I ran it on a 16GB GPU without sharding or half a day of dependency bingo. 768px square images worked: 1024px needed a bit more patience and the right precision settings, but still fine. For me, this matters more than a fancy demo. If the model behaves well on a common laptop GPU, I can keep it in my everyday loop instead of spinning up a separate rig.
If you’re at 8–12GB, you might need to drop resolution or lean on the API. If you’ve got 24GB+, you’ll get more headroom for large formats, but the model’s core value, fast, text-stable results, shows up even at smaller sizes.
Benchmark Performance
Benchmarks aren’t the work, but they help sanity-check impressions.
#1 Open-Source on Artificial Analysis Leaderboard
 As of early Feb 2026, Z-Image-Turbo is listed at or near the top among open-source image models on the Artificial Analysis leaderboard (rankings shift, so treat this as a snapshot). That lines up with what I felt: speed and text fidelity seem to be its calling cards. Leaderboards don’t measure everything, but they’re a useful proxy for how a model generalizes beyond a curated demo.
How It Compares to Closed-Source Models
Against the big hosted models, Z-Image-Turbo trades peak photorealism for speed, cost, and controllable text. If you want glossy, cinematic scenes with intricate lighting, some closed options still edge it out. If you want a clean graphic with legible words in two minutes, this one holds its ground. I also noticed fewer prompt gymnastics were needed to keep typography intact, less trial, more outcome. For small teams or solo creators, that balance is usually the difference between “nice experiment” and “this ships today.”
Who Should Use Z-Image-Turbo?
Ideal Use Cases
- Social graphics with short, readable text (announcements, banners, thumbnails)
- Product mockups and simple UI scenes where labels need to survive
- Internal docs and slides that benefit from quick visuals without a design detour
- Bilingual assets where prompt language flexibility saves back-and-forth
- Rapid iteration in sprints, when you want 3–5 decent variants fast and move on
In my tests, the win wasn’t just raw speed. It was predictability. I could nudge style or layout without losing the text entirely, which meant fewer restarts.
When to Choose Other Models Instead
- High-end photorealism for large-format prints or ads, some closed models still deliver a more polished finish.
- Long paragraphs or complex typography systems, use a layout tool or post-process.
- Heavy compositing or multi-image consistency (same character across scenes), you’ll want a model with strong identity and multi-shot controls.
If your work leans toward cinematic storytelling or intricate lighting studies, you might prefer a different tool. Z-Image-Turbo is more of a daily driver than a show car.
How to Get Started
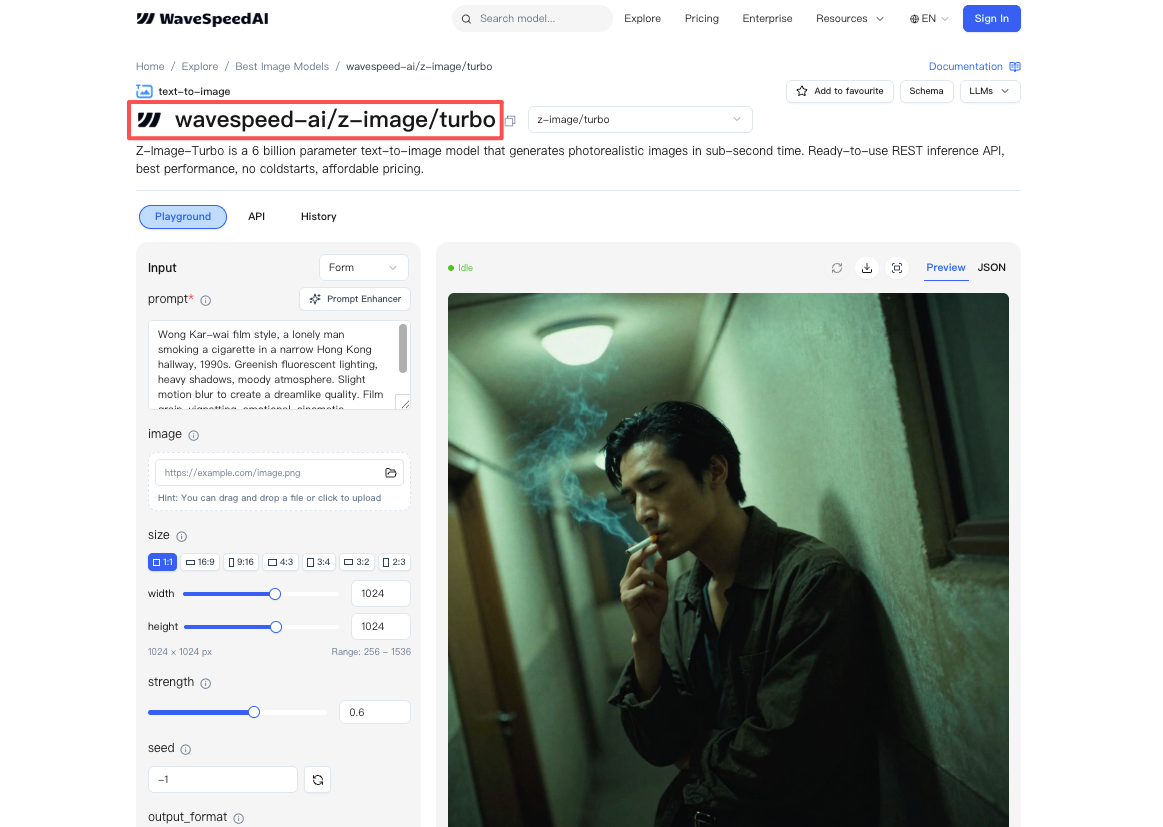
WaveSpeed API Quick Start
I tried the WaveSpeed API first to avoid setup drift. Authentication was standard, and the request body was simple: prompt, steps (I stuck with 8), size, and a seed if you want reproducibility. Defaults were sensible. If you’re testing text rendering, start with short phrases and a medium resolution, then scale up once you like the look. I went from idea to first usable image in under five minutes, the quickest part of this whole experiment.
If you prefer local, the model ran cleanly on a 16GB GPU with typical precision settings. Keep an eye on VRAM as you cross 768px. If you hit limits, drop steps before you drop guidance: 8-step sampling is the point here.
Pricing Overview ($0.005/image)
 Through WaveSpeed, pricing came out to about $0.005 per image at standard settings. That’s hard to complain about for drafts, social assets, or quick experiments. If you’re generating at scale, watch for concurrency caps, latency stayed low for me with small bursts, but I didn’t stress test beyond a handful of parallel jobs.
This worked for me, your mileage may vary. If you’re juggling bilingual prompts or just want text that looks like it belongs in the image, it’s worth a look. The last thing I noticed, almost by accident: I stopped screenshotting and editing over and over. Fewer detours. That felt like the point.
Related Articles
LTX-2.3 API Guide: 7 Endpoints, Access Options & Production Use
LTX-2.3: What's New in Lightricks' 22B Video Model (2026)
WaveSpeedAI vs Media.io Watermark Remover: Which One Actually Delivers?

Goodbye Sora: Top 5 Best Sora Alternatives for Making AI Videos in 2026

Google Veo 4: What We Might See From Google's Next AI Video Model