Z-Image Edit Workflow on WaveSpeed: Inpainting, Outpainting, and Object Removal

I’m Dora. This started with a small snag: a product photo where the mug looked perfect, but the table had a faint scratch that kept pulling my eye. I didn’t want a full Photoshop session. I just wanted the scratch gone, the shadow intact, and my focus back.
That’s how I ended up building a simple rhythm around the Z-Image Edit Workflow on WaveSpeed. Not because it’s flashy, but because it let me fix small things without losing an afternoon. I’ve been testing this on and off through January 2026, making small changes to real images: cleaning backgrounds, extending edges for new crops, removing stray cables, adding a bit of breathing room around tight shots.
Here’s how I work with it now, what helps, where it pushes back, and when I switch to something else.
Edit modes explained
WaveSpeed’s Z-Image Edit Workflow breaks down into a few modes that feel familiar if you’ve used modern image editors with AI: inpainting, outpainting, and object removal (which is basically inpainting with a purpose). There’s also masking across the board. The names aren’t the point: how they behave is.
What surprised me first: the modes share the same mental model, paint where change should happen, leave the rest alone. That consistency matters more than it sounds. I didn’t have to re-learn the tool for each task. I just set a mask and nudged the prompt.
How I pick a mode:
- Inpainting when I need to alter something inside the frame (fix a logo edge, smooth a crease, nudge colors).
- Outpainting when I need more canvas (wider thumbnail crop, extra headroom, extending a background to fit a layout).
- Object removal when something specific needs to disappear (wires, scuffs, signage). It’s still inpainting, just guided by a clearer prompt.
Two small field notes from this past week:
- Brush softness matters more than brush size. A soft feather on the mask blends better with WaveSpeed’s edges, especially on fabrics and shadows.
- Prompts can be short. “Remove cable, preserve wood grain and reflections” worked better than a long paragraph. The model seems to handle constraints well when they’re crisp.
I rarely touch global adjustments here. If I need overall color or exposure changes, I do that before or after in a traditional editor. WaveSpeed is at its best when it’s solving local problems with minimal fuss.
Inpainting steps
I use inpainting for quiet fixes: logo cleanup, small retouching, texture repairs. Here’s the flow that’s stuck for me with the Z-Image Edit Workflow on WaveSpeed.
My working pass
- Duplicate the layer or save a version. I like a safe rollback.
- Mask the smallest believable area. If I mask too wide, I get “helpful” changes I didn’t ask for.
- Write one sentence with both action and constraint: “Smooth wrinkle, preserve cotton weave and lighting direction from left.”
- Run a single pass at default strength. I only turn up strength if the source is heavily damaged.
- Compare at 100% zoom, then zoom out to the full frame. If it looks perfect at 300% but odd at normal size, I undo it.
Friction I hit (and how I worked around it)
- Texture drift: On wood or fabric, the grain sometimes smears. Smaller masks help. So does the phrase “preserve original grain pattern.”
- Edge halos: If the mask touches a high-contrast edge (like a mug against a dark table), I expand the mask by 1–2px and lower brush hardness to avoid a bright seam.
- Repetition: Generated texture can look too neat. I add “natural variation” or “subtle imperfections” to the prompt. Tiny note, big difference.
Time saved? On a batch of nine product shots, inpainting cut my retouching from ~40 minutes to ~18. It wasn’t instant, but it reduced the mental load. I could move on without getting stuck in pixel-perfect rabbit holes.
Outpainting steps
Outpainting is where the Z-Image Edit Workflow on WaveSpeed feels quietly strong. I use it to create breathing room, more margin for text overlays, YouTube thumbnails, or a square crop from a too-tight portrait.
What I do when a crop is too tight
- Set the target aspect ratio first (if your layout needs one). Otherwise you’ll extend in the wrong direction.
- Outpaint in small frames. Extend one side, check the transition, then extend the next. Big jumps create weird, repeating patterns.
- Use directional cues in the prompt: “Extend concrete floor to the right: match lighting from top-left: keep slight scuffs.”
- Keep edges boring on purpose. Clean gradients and simple textures outpaint best. If the background is chaotic (leaves, crowds), I add “slightly defocused background” to lower the noise.
Where it stumbles
- Symmetry traps: Perfectly centered patterns (tiles, windows) can misalign. I split the extension in halves and nudge the mask to respect the pattern.
- Complex hair: Extending around hair wisps can turn crunchy. I backfill with a softer background rather than chasing every strand.
For social headers, I’ve used outpainting to add 10–20% more space around a subject without anyone noticing. That’s the sweet spot, enough to layout cleanly, not enough to feel synthetic.
Object removal tips
 Object removal in the Z-Image Edit Workflow is just focused inpainting. The trick is telling it what to keep, not only what to remove.
What’s worked best for me:
- Name the texture you want back: “Remove cable: restore wood grain and subtle reflection from window.”
- Respect shadows. If you delete an object but keep its shadow, the brain protests. I usually mask both.
- Use irregular masks. Straight-edged masks leave straight-edged seams.
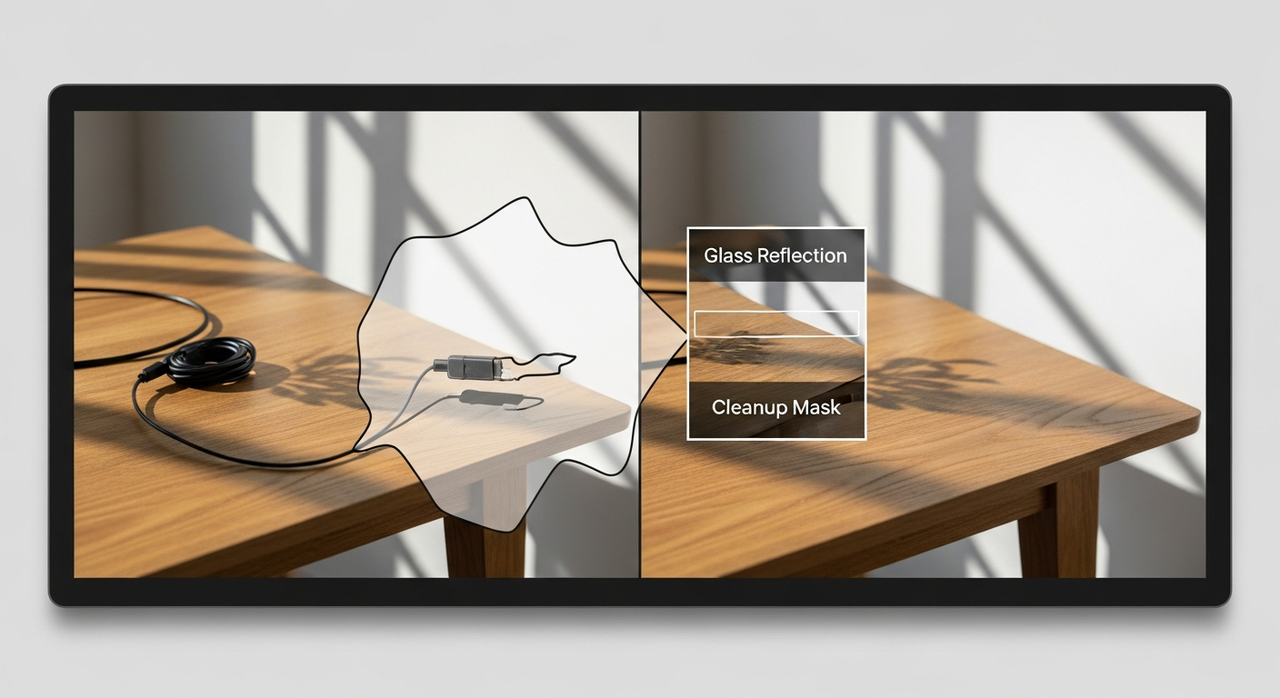
What disappointed me a bit: reflections in glass. If a sign reflects in a window, removing both the sign and the reflection can look smudgy. I sometimes run two passes, first the object, then a narrower pass just for reflection cleanup with “crisp glass surface, slight glare.” It’s not perfect, but it keeps the smudge to a minimum.
Masking best practices
Masking sounds boring until you see how much it affects the result. On WaveSpeed, clean masks make the difference between subtle edits and obvious AI shine.
A few habits I keep:
- Feather slightly (3–8px on medium images). Hard edges scream “edited.”
- Avoid touching high-contrast edges unless you mean to change them. If you must, expand the mask a hair and reduce hardness.
- Mask for intent, not convenience. Smaller, shaped masks get better texture continuation.
- Work at the output size. If the final image will be 1200px wide, don’t judge the mask at 400% zoom.
- Save masks for reuse. For batch work, reusing a good mask on similar shots keeps results consistent.
One subtle thing: I often paint the mask to include a tiny slice of the surrounding context (1–2px). It seems to give the model a better handoff when it stitches old and new pixels together.
6 example prompts
I don’t overthink prompts here. One sentence, clear constraints, done. These are from edits I ran in January 2026:
- “Remove power cable: restore wood grain and keep natural window reflection: lighting from left.”
- “Extend white seamless background 15% on the right: match gradient and soft shadow under mug.”
- “Clean small scratch on table: preserve oak texture and specular highlight: no blur.”
- “Widen sky area for banner crop: keep cloud softness and sun direction: avoid repeating patterns.”
- “Tighten logo edge on label: maintain print texture: no color shift to red.”
- “Fill missing corner of notebook: continue dotted page pattern: keep slight perspective skew.”
If a result looks a little too perfect (plasticky), I add: “retain subtle imperfections” or “slight surface irregularities.” It helps avoid that uncanny showroom finish.
Artifact fixes
When the Z-Image Edit Workflow on WaveSpeed leaves artifacts, it’s usually one of five things: halos, texture smear, repeating patterns, color cast, or sharpness mismatch.
What I do, in order:
- Halos: Reduce brush hardness, include a sliver of the edge in the mask, re-run with “seamless transition.”
- Texture smear: Smaller mask: add “preserve [texture] detail.” Sometimes a second pass with lower strength.
- Repeating patterns: Outpaint in smaller chunks: add “natural variation.”
- Color cast: Add “match surrounding color temperature” or correct later with a quick HSL tweak.
- Sharpness mismatch: If the patch is too sharp, I add “match lens softness” or lightly blur after. If too soft, I sharpen the whole image a touch, not just the patch.
I also flip the image horizontally for a quick gut check. Artifacts jump out when you break your visual habit.
Export formats
Exports on my end have been straightforward. In my January 2026 tests, I saw PNG and JPG as the most reliable options on WaveSpeed, with WebP available in some projects. PNG keeps transparency and clean edges: JPG is fine for anything photographic. When I needed a layered handoff, I exported a high-res PNG and kept masks in the project rather than expecting a PSD.
A practical note: I name files with intent, image-purpose_size_version (e.g., hero-landing_1600w_v3.png). It saves me later when I’m digging for the right asset.

This is a small workflow, but it’s one I return to. Not because it’s exciting, because it removes just enough friction that I’m willing to clean a photo instead of living with the scratch. Your mileage may vary, of course. If you’re already fluent in a heavy editor and enjoy the control, you may not need this. But if you’ve got a few rough spots to smooth each week, the Z-Image Edit Workflow on WaveSpeed earns its quiet place.
We also aim to make the routine image editing tasks more manageable. Therefore, in WaveSpeed, we have introduced the Z-Image Edit Workflow, which helps you quickly handle details, expand the canvas or remove distractions: have a try!
I still notice the urge to keep tweaking after the fix. Most days, I close the tab when the image stops calling attention to itself, that’s usually the sign I’m done.
Related Articles

ComfyUI Nano Banana Pro Workflow: Install, Nodes, and Best Defaults

WaveSpeed AI Partners with Azuro AI to Power France's Largest AI Hackathon

Nano Banana Pro API on WaveSpeed: How to Call It + Pricing Notes

WAN 2.5 Animate: How to Get Smooth Motion Without Flicker

WAN 2.5 API Quickstart on WaveSpeed: Auth, Parameters, and Example Requests