How to Train Your Own LoRA Model Without Coding
Learn how to train your own LoRA model on WaveSpeedAI without coding, from preparing a dataset to using the trained model in generation workflows.
Introduction
If you want an AI model that understands your style, subject, or visual preferences better, training a LoRA model is one of the easiest ways to get there.
LoRA is a lightweight fine-tuning method. Instead of retraining a large model from scratch, it adds a small adaptation layer on top of a base model so the model can learn a specific style, concept, or subject more efficiently.
Compared with full fine-tuning, LoRA training is faster, cheaper, and much easier to manage. You can use it to teach a model a certain illustration style, a character design, a product look, or a repeatable visual concept that you want to reuse in future generations.
In this guide, we will walk through the full process on WaveSpeedAI: preparing your dataset, setting a trigger word, adjusting the key training parameters, starting the job, and then using the trained LoRA in generation workflows.
For this tutorial, we will use WaveSpeedAI and the qwen-image-lora-trainer training tool.

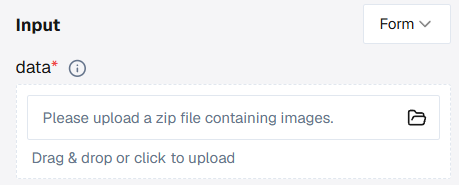
Data Upload
Start by uploading a .zip file in the data field.
We recommend preparing 10 to 20 images that clearly represent the style, subject, or effect you want the LoRA to learn. For example, if you want to train a comic-style LoRA, collect a small but consistent set of images in that style and compress them into a single .zip file.
To get better results, keep these dataset rules in mind:
- Use a diverse but consistent image set. Show the subject or style in different angles, poses, or compositions, but keep the overall concept consistent.
- Keep the important features clear. Avoid cluttered images where the main subject is hard to identify.
- Use high-quality images with no watermarks, compression damage, or irrelevant overlays.
- If possible, keep the images at a similar size and quality level.
- Inside the zip file, include only the training assets you actually need, usually image files and optional matching .txt caption files.
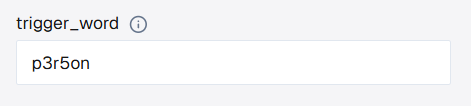
Set the Trigger Word
The trigger_word is the keyword that tells the model to activate what it learned from your dataset during generation.
Choose a unique identifier, such as p3r5on, and enter it in the trigger word field.
Here is how it works:
- Without captions: the system uses the word you enter in the trigger word field as the shared identifier for the dataset.
- With captions: the system does not insert the trigger word automatically. If you want to use it during inference, you should add it manually to each caption where appropriate.
A caption is the text inside a .txt file with the same filename as the image. For example, if you want to train a model on images of Angelina Jolie, your dataset can be organized like this:

For example, 1.txt might contain Angelina Jolie in a black dress. If you also want to keep p3r5on as the trigger word, you can write p3r5on Angelina Jolie in a black dress instead.
Configure Training Parameters
WaveSpeedAI already provides sensible default settings, so in many cases you can start with the default values and only make small adjustments when needed.
If you want to customize the training more carefully, focus on these three parameters:
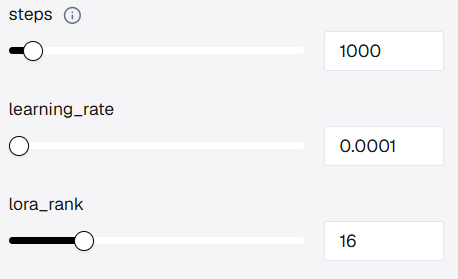
a. Steps: This controls how long the model trains on your dataset. Too few steps may lead to weak learning, while too many may cause overfitting, where the LoRA memorizes the examples too closely instead of learning the broader pattern.
b. learning_rate: This controls how aggressively the model updates during training. A higher value can learn faster but may become unstable. A lower value is safer but usually needs more training time.
c. lora_rank: This affects how much capacity the LoRA has to store details. A higher rank can capture more nuance, but it also increases model size. A lower rank keeps the LoRA lighter, but it may miss more complex patterns.
As a rough reference, training for 1000 steps usually takes around 8 minutes, while 3000 steps may take around 25 minutes, depending on the model and workload.
Start Training
Once your dataset and parameters are ready, click Run to start training. The estimated training price is also shown directly in the Run button, so you can confirm the cost before launching the job.

The system will handle the training job in the background. You do not need to keep adjusting anything while it runs.
Model Delivery
After training is complete, you can either download the LoRA file to your computer or copy the hosted model URL.
- If you download the file, you can use it in your own local workflow.
- If you keep the hosted URL, you can call the trained LoRA directly inside WaveSpeedAI models that support LoRA loading.
If you want to keep the model permanently, an easy option is to open history after training finishes and use the Hugging Face icon to upload the LoRA directly to your Hugging Face repository. That gives you a permanent model URL you can reuse later.
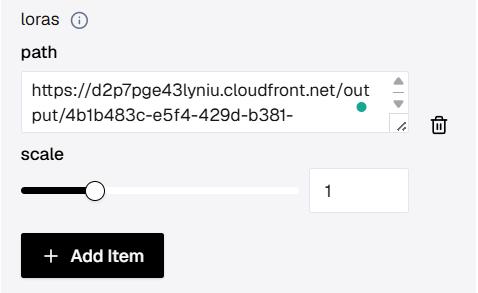
To use the trained LoRA on WaveSpeedAI, open a compatible model such as wavespeed-ai/z-image/turbo-lora.
- Click + Add Item in the LoRA section.
- Paste the copied model URL into the
pathfield. - Keep the
scaleat the default value to start. - Run the model again and include your trigger word in the prompt.
That will let you generate images using the style or concept you just trained.
Here is an example of the kind of result you can generate after loading the trained LoRA:

How to Save Your Model Permanently
WaveSpeedAI keeps the trained model available for 7 days. If you want a more permanent and portable way to store it, you can upload the LoRA to Hugging Face.
Another easy option is to open history. For completed training jobs, you will see a Hugging Face upload button that lets you send the LoRA directly to your Hugging Face repository.

If you prefer to upload the file manually, follow these steps:
Step 1: Create or sign in to your Hugging Face account. Then click your avatar in the upper-right corner.
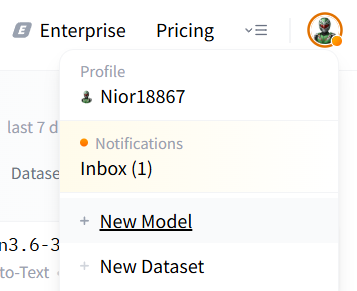
Step 2: Select New Model.
Step 3: Inside the new repository, you can add a README or Model Card to describe what the LoRA does and how it should be used.
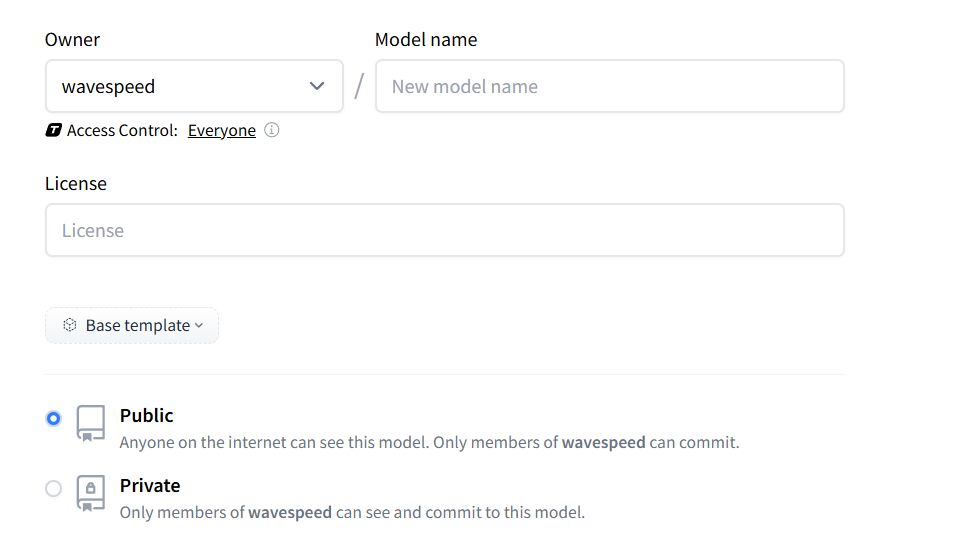
Step 4: After the repository is created, upload your LoRA file so it is stored in a permanent Hugging Face repo.
Step 5: To use it on WaveSpeedAI later, you can either copy the direct file URL or use the repository name in the format <owner>/<model-name> in the playground path field.
Either method gives you a reusable way to load your LoRA on WaveSpeedAI whenever you want.
Final Thoughts
Training your own LoRA model on WaveSpeedAI is straightforward. With a small dataset and a few practical settings, you can build a reusable model that reflects your style, your subject, or your creative workflow.
Whether you are an artist, designer, marketer, or simply experimenting with AI, LoRA gives you more control over the results you create. Start with a small dataset, test a few prompts, and keep refining until the model behaves the way you want.
Related Articles

Introducing Alibaba WAN 2.7 Video Edit on WaveSpeedAI

Introducing Alibaba WAN 2.7 Video Extend on WaveSpeedAI

Introducing Alibaba WAN 2.7 Image Edit on WaveSpeedAI

Introducing Alibaba WAN 2.7 Image Edit Pro on WaveSpeedAI

Introducing Alibaba WAN 2.7 Text-to-Image on WaveSpeedAI
