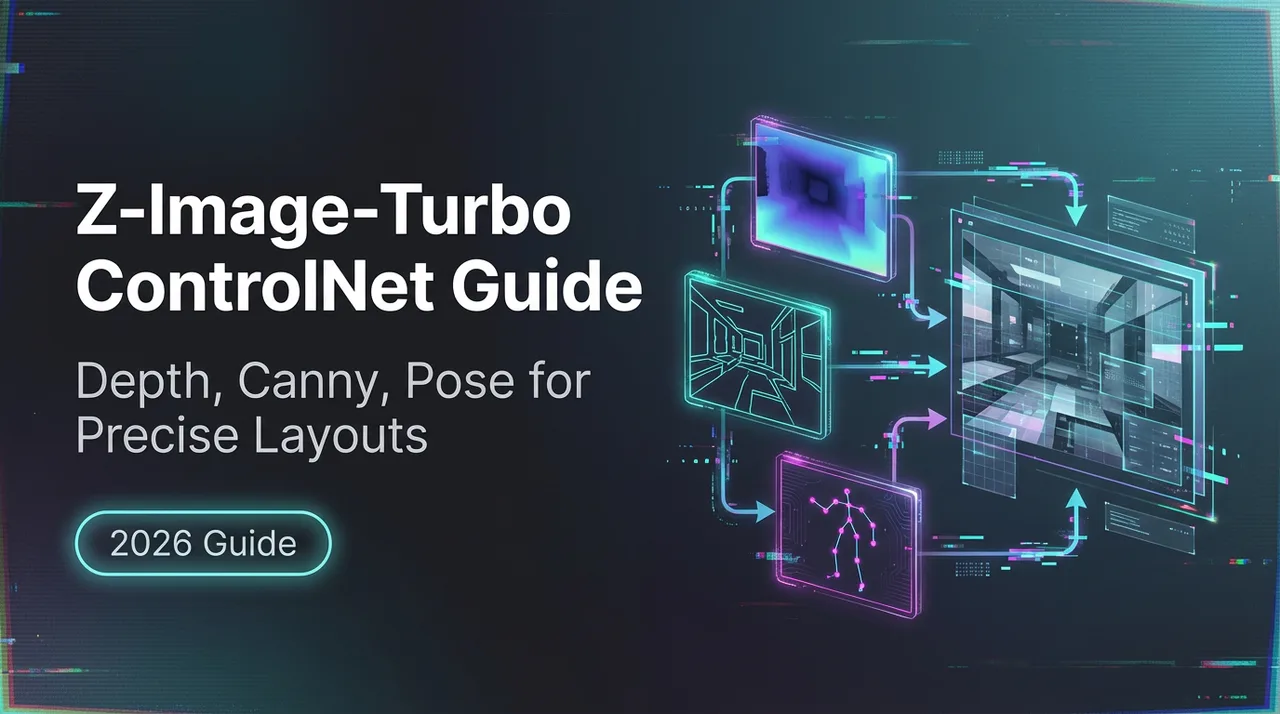
Z-Image-Turbo ControlNet Guide: Depth, Canny, Pose for Precise Layouts
Master Z-Image-Turbo ControlNet with Depth, Canny, and Pose modes. Learn when to use each mode, strength settings, and how to maintain composition while changing style.
Hey, my friends. How’s going on? I’m Dora. The first time I tried to guide an image with a stick-figure pose, the result looked like a mannequin escaped a thrift store. Not disastrous, just… off. I wanted the model to respect structure without flattening the style. So in January 2026, I spent a few afternoons testing ControlNet inside Z-Image-Turbo on small, real tasks: turning a napkin sketch into a clean render, keeping a building’s geometry intact, and nudging character poses without losing mood. This guide is the trail of notes I wish I had on day one, quiet, practical, and enough to help you decide if this fits your workflow.
What is ControlNet?
ControlNet is a way to steer an image model with structural hints, like edges, depth, or human pose, while still letting the model paint in its own style. Instead of pushing prompts harder or stacking negative tokens, you feed it a separate “control” image that captures the bones of your scene. The model then blends structure and style, ideally with less wrestling.
Separating Structure from Style
In practice, I think about it like this:
- Prompt and model checkpoint handle style (lighting, texture, vibe).
- ControlNet handles structure (composition, contours, spatial relationships, pose).
When those two stay in their lanes, I get fewer uncanny results. If I try to force structure with prompt hacks, I usually pay for it with odd proportions or drift in later iterations.
How Control Modes Work
Each mode extracts a different map from your input:
- Depth mode estimates 3D distances. It gives the model a sense of foreground and background.
- Canny mode extracts clean edges. It’s blunt but reliable.
- Pose mode finds human keypoints and skeletons. Great for action or consistency across frames.
Z-Image-Turbo (in my January 2026 tests) exposes these as ControlNet modes you can toggle per request. The names may vary by platform, but the idea’s the same. If you want the formal version, the ControlNet paper and the Stable Diffusion AUTOMATIC1111 ControlNet docs are the best starting points.
Three Control Modes Explained
Depth Mode, 3D Spatial Relationships
Depth mode is for scenes where distance matters. Architecture, interiors, landscapes, anything where “this object sits in front of that object” needs to hold. In my runs, depth was forgiving with texture and color shifts but protective about camera distance and big shapes. When I asked it for a different lens look (wider field of view) without changing the depth map, it resisted, which I appreciated.
Field note: depth will happily keep an awkward perspective if your source image has it. If your reference photo leans, your result leans. I learned to fix perspective first.
Canny Mode, Edge Detection
Canny is the neatest of the three. It extracts edges and ignores interior texture. I used it when I had a pencil sketch or a wireframe and wanted the model to stay inside the lines, literally. It held typography blocks, logos, and product outlines better than depth. But it can be brittle: if you push the strength too high, it can flatten style or produce color banding around edges.
Field note: low-contrast edges sometimes vanish in the canny map. I started boosting contrast on my sketch before sending it in. Tiny change, fewer surprises.
Pose Mode, Human Body Keypoints
Pose mode maps joints and limb positions. It’s less about facial likeness and more about body rhythm, where the hands go, the bend in the knee, the tilt of the shoulders. When I mocked up character beats for a storyboard, pose let me keep action readable while changing outfits, lighting, and mood.
Field note: hands improved, but only within the pose’s limits. If the skeleton suggests five short fingers in a cluster, the model won’t invent a graceful hand. Pose preserves intention: it doesn’t fix anatomy on its own.
When to Use Each Mode
Depth: Architecture, Landscapes
- Use it when camera position and scale matter.
- Good for: buildings, interiors, product-in-environment shots.
- Skip it if you only care about crisp linework: depth can be too soft for precise logos.
What I saw: depth guided light placement subtly. If a wall was nearer in the depth map, the model respected how light fell on it. I didn’t have to over-specify lighting in the prompt.
Canny: Sketches, Precise Shapes
- Use it when you need clean silhouettes and reliable alignment.
- Good for: UI mockups, packaging, line-art to color.
- Watch out for: over-constrained style and flat shading if strength is too high.
What I saw: canny preserved type boxes and icon spacing better than any other mode. I still would not set final type in AI, but for layout ideation it lowered friction.
Pose: Characters, Action Scenes
- Use it when body language matters more than exact face.
- Good for: keyframes, comics, fashion poses.
- Not ideal for: strict likeness of a person without a face reference workflow.
What I saw: pose stabilized multi-shot sequences. I could keep the same action beats while exploring different settings and palettes. Less mental juggling.
API Implementation
I tested the Z-Image-Turbo ControlNet endpoints in late January 2026 with around 30 requests per mode. I kept inputs small (768 px) to stay quick and consistent.
Mode Parameter Selection
Most APIs expose something like:
- control_mode: “depth” | “canny” | “pose”
- control_image: the map or source image the server converts into a map
- prompt / negative_prompt: style and content guidance
- seed: for repeatability
If your platform offers automatic map extraction, you can send a normal image and set control_mode: the server will produce the depth/canny/pose map.
Strength Setting (Start at 0.6)
The control strength decides how strictly the structure is enforced. My baseline:
- 0.6 for first passes (balanced)
- 0.4 when I want more style freedom
- 0.8 when I need near-lock precision (logos, perspective-critical renders)
At 1.0, I often saw stiffness. At 0.2, control was barely there. 0.6 felt like the sweet spot.
Python Code Example
Below is a minimal example. Your parameter names may differ, check your provider’s docs. The pattern is consistent across most REST wrappers I’ve used.
import requests


API_URL = "https://api.z-image-turbo.example/v1/images/generate" # placeholder

API_KEY = "YOUR_API_KEY"


payload = {

"prompt": "sunlit modern living room, warm wood, soft textiles, filmic lighting",

"negative_prompt": "distorted furniture, blown highlights",

"seed": 12345,

"width": 768,

"height": 512,

"control_mode": "depth", # "canny" or "pose"

"control_strength": 0.6,

}


files = {
# Send a single reference: server extracts the chosen map

"control_image": open("/path/to/reference.jpg", "rb"),

}


headers = {"Authorization": f"Bearer {API_KEY}"}


resp = requests.post(API_URL, data=payload, files=files, headers=headers, timeout=60)

resp.raise_for_status()


with open("out.png", "wb") as f:

f.write(resp.content)
If you need more detail on the underlying control maps, the ControlNet docs in AUTOMATIC1111 and OpenMMLab’s MMPose (for pose) explain the signals well.
Workflow Examples
Sketch to Finished Art
Small gripe that started this whole thing: turning a loose pencil sketch into something presentable usually ate an evening. With canny at 0.6, I sent a scan of the sketch, added a short style prompt (ink-and-wash, muted palette), and let it draft variations. The first passes were a little too clean, almost sterile. Dropping strength to 0.45 brought back some wobble from the original lines, which felt more honest. Time saved: maybe 30–40 minutes, but the bigger win was mental, far less fiddling with masks.
Friction: faint lines disappeared in the edge map until I bumped contrast in the scan. After that, consistency held.
Architectural Visualization
I tried depth mode on a simple living room layout from a phone photo (January 22, 2026). The goal: keep the sofa and window positions, explore materials. With control_strength at 0.7, the model respected wall positions and the window grid, while swapping wood tones and fabric textures. When I pushed to 0.85, materials started to look over-anchored, too literal, less atmospheric. I settled at 0.6 or 0.65 for most interior shots.
A small surprise: adding a lens hint in the prompt (“35mm, shallow depth of field”) did less than I expected because the depth map was calling the shots. When I wanted a different camera feel, I re-shot the reference from a new angle. Less clever, more reliable.
Character Concept Art
Pose mode helped me iterate on a running stance across five frames. Same character, different moods. I used a quick stick-figure from a pose tool as the control image, then layered style prompts, streetwear, backlight, dusk. Hands improved across runs but still needed touch-ups. I didn’t fight it. For internal work, readable hands were enough: for release art, I’d composite fingers from a cleaner pass or paint them.
What held up: the arc of the body and the direction of the gaze stayed consistent. That made the set feel like a sequence, not five unrelated images.
, Why this matters to me: ControlNet reduces the need for prompt micromanagement when structure is the hard part. It doesn’t remove judgment. It just moves the attention to the parts worth caring about.
Who might like this:
- You keep rough reference photos around and want them to actually guide results.
- You draw loose and want clean renders without losing the gesture.
- You storyboard and need poses to stay readable while style shifts.
Who probably won’t:
- You want exact likeness without extra steps (you’ll need a face/ID workflow).
- You dislike pre-processing or tweaking reference images.
If you’re curious, start small: pick one mode, set strength to 0.6, and run the same input five times while changing only the prompt. Watch what changes and what refuses to move. That refusal, that’s your structure talking.
I still keep a note on my desk: “Fix the reference, not the prompt.” It saves me from arguing with the model when the image is simply telling the truth.