Video Face Swap Explained: How It Works + API Guide
Hello, I’m Dora. I’ll be honest — the first time I tried calling a video face swap API, I got back a response that looked almost right. The face was there. The timing was off by half a second. The lighting made the subject look like they were glowing slightly from within, like a discount ghost.
That’s the thing about video face swap technology. It seems simple from the outside — swap face A onto body B, done — but the moment you go beyond demo clips and try to build something real, you realize how many moving parts are actually happening under the hood. Understanding those parts is the difference between output that looks polished and output that makes your users cringe.
This guide covers how video face swap actually works, the different approaches out there, what your API needs before it can do anything useful, and how to handle the failure modes that will absolutely find you eventually.
What Video Face Swap Actually Does
Let me break this down clearly, because a lot of explainers skip the part that actually matters.
Video face swap is not a filter. It’s not a mask laid over footage. What it does — at a fairly deep level — is detect a face in each frame of a video, map its geometry, extract the identity of a source face, and blend the source identity onto the target’s facial structure while preserving the target’s movement, lighting, and expression.
That’s three distinct problems happening in sequence.
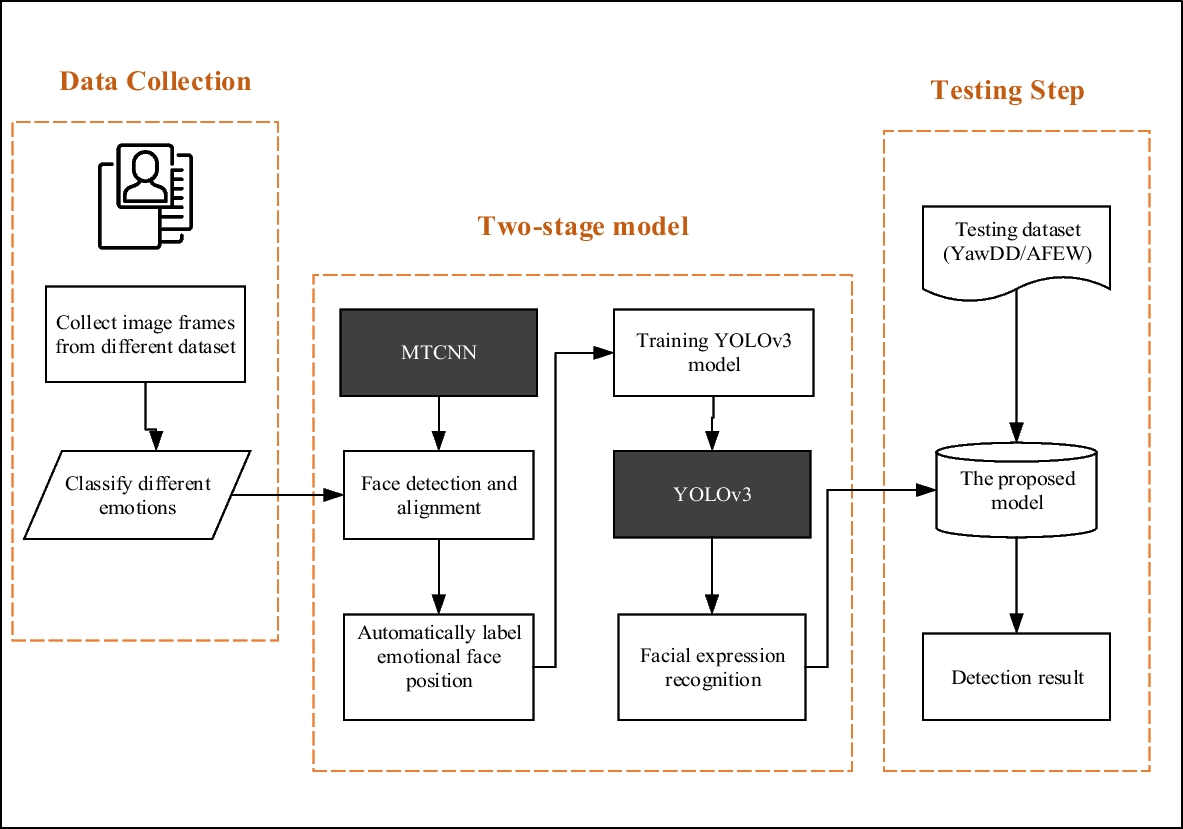
Detection → Alignment → Blending Pipeline
Detection is where the model finds faces in the frame. This sounds easy. It’s not. Faces that are partially occluded, turned at sharp angles, or moving quickly all create detection failures. Most production systems use variants of multi-task cascaded convolutional networks — you can read about the foundational MTCNN approach in this face detection deep learning guide — though more recent architectures have improved significantly on those early benchmarks.
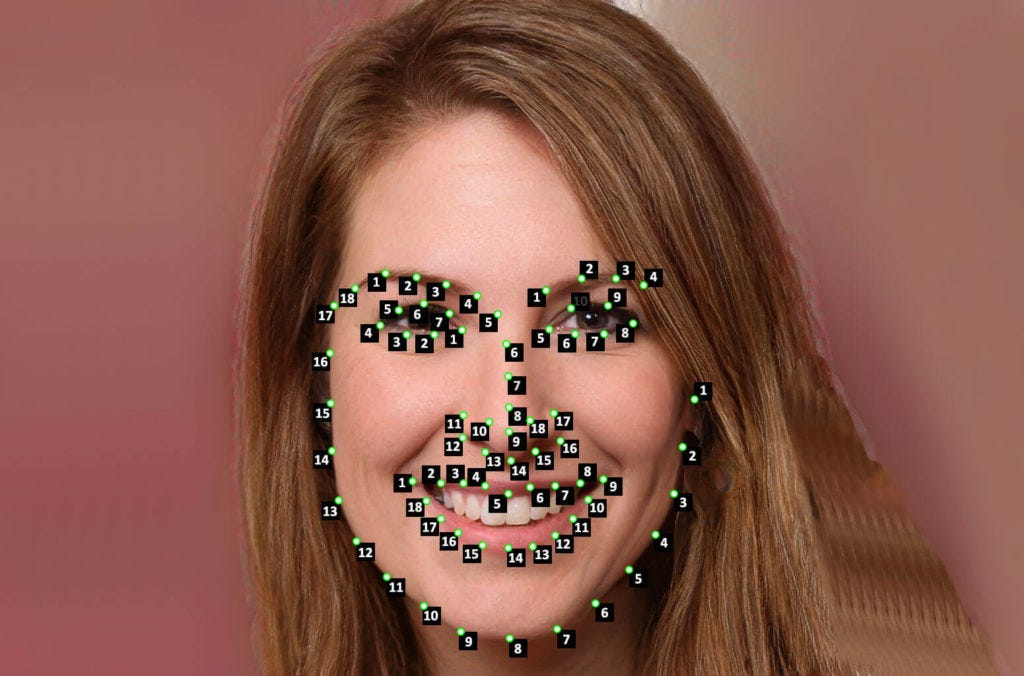
Alignment is the step most people don’t think about but it’s genuinely critical. Once a face is detected, the model identifies facial landmarks — eyes, nose tip, mouth corners — and uses them to normalize the face into a canonical position and scale. Without this, the swap looks like someone put a face on at a slightly wrong angle and hoped nobody noticed. They always notice.
Blending is where the actual identity transfer happens. The model takes the source face’s identity features, projects them onto the target face geometry, and composites the result back into the frame. Modern approaches use generative adversarial networks (GANs) for this — a generator that creates the blended face and a discriminator that evaluates realism — which is why understanding how GAN-based deepfake generation works is genuinely useful context before you start debugging output.
What Output Quality Actually Means
Here’s something that confused me early on: “quality” in face swap output isn’t one number. It’s at least three separate things.
Identity preservation — does the output actually look like the source face, and not just a blurry average of both?
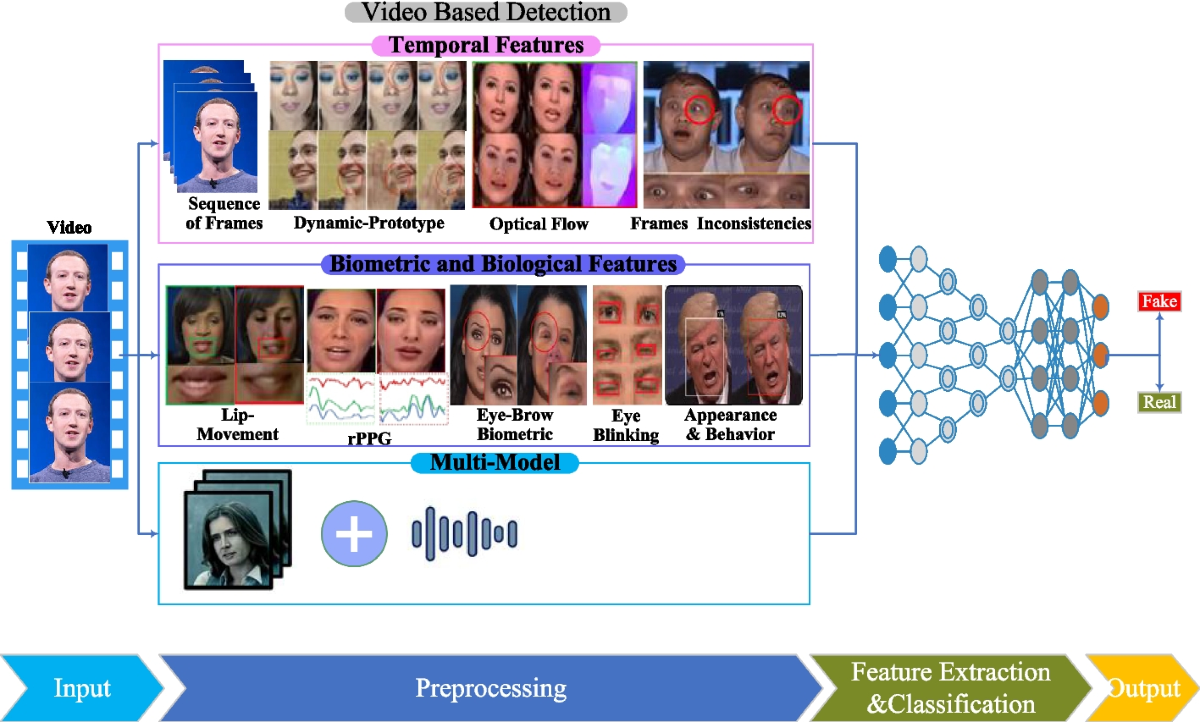
Temporal consistency — does the face look the same across frames, or does it flicker subtly?
Photorealism — does the result look like it belongs in the scene, or does it look composited?
You can have excellent identity preservation and terrible temporal consistency. You can have beautiful photorealism with poor identity transfer. Most APIs expose settings or quality tiers that trade off between these. Knowing which one matters for your use case will save you a lot of confusion.
Types of Video Face Swap Approaches
Not all video face swap models work the same way. Similar architectural differences exist across modern AI video generation models like Seedance 2.0, where temporal consistency and motion modeling are handled very differently depending on the approach. There are two important axes to understand before you pick a tool or API.
Frame-by-Frame vs. Temporal-Aware Models
Frame-by-frame models treat each frame of the video independently. They’re generally faster and simpler to implement, but they don’t account for the fact that video is a sequence of related images. The result: subtle flickering between frames, especially around the edges of the face or in low-light conditions.
Temporal-aware models process frames with knowledge of what came before and after — essentially understanding motion and maintaining consistency across the clip. Similar trade-offs appear in comparisons between leading AI video models, where stability and motion realism are major differentiators— essentially understanding motion and maintaining consistency across the clip. The output is smoother and more stable, but these models are heavier and slower. For anything longer than a few seconds or intended for close viewing, temporal-aware is worth the latency cost.
My honest experience: if you’re prototyping or generating thumbnails, frame-by-frame is fine. If you’re building something people will watch on a full-size screen, you’ll regret the flickering.
Single Face vs. Multi-Face
Single-face models are simpler and generally higher quality for their specific task. If your use case involves one clearly visible face in the frame — which covers most production scenarios — this is the right starting point.
Multi-face models can detect and swap several faces in a single frame. They’re useful for ensemble shots, group footage, or scenarios where you don’t fully control the input video. The tradeoff is that they’re more computationally expensive and more prone to incorrect face assignment — i.e., the model swaps the wrong face onto the wrong body. Worth knowing before you send a four-person clip and get back something unintentionally surreal.
Before You Call the API: What You Need
This is where most people waste time. Not because the API is hard, but because the input requirements are more specific than the documentation usually makes clear.
Input Requirements (Format, Resolution, Clip Length)
Most video face swap APIs expect:
- Video format: MP4 with H.264 encoding is the safest default. Some APIs also accept WebM or MOV, but H.264/MP4 is the most universally supported.
- Resolution: 720p is a practical minimum for acceptable swap quality. 1080p gives the model more facial detail to work with. Below 480p, most models start producing visible artifacts — the face region simply doesn’t have enough pixels for clean blending.
- Clip length: Many APIs cap synchronous processing at 30–60 seconds. Longer clips require async job submission with webhook callbacks. Know which category your clips fall into before you architect your request handling.
- Source image: For the face you’re swapping in, a single well-lit frontal photo is usually sufficient. Some models accept video sources too, but a clear still image with even lighting typically produces more consistent identity transfer.
Face Angle and Lighting Constraints
Quick reality check here: the models are not magic.
Face angle: Most models work well up to about 30–35 degrees off-axis from a frontal view. Beyond that, you start losing landmark accuracy, which cascades into alignment errors, which produces blending artifacts. Profiles are generally unsupported or produce unusable output. If your source footage has subjects frequently looking away from camera, temper your quality expectations accordingly.
Lighting: Harsh directional lighting — side-lit faces, strong overhead lighting that creates deep eye shadows — is harder for the blending step to handle convincingly. The model needs to reconcile the lighting in the source face with the lighting in the target frame, and the less those match, the more visible the seam.
I’m not saying avoid dim footage. I’m saying: if you’re generating source material and have any control over it, even lighting will meaningfully improve your output.

API Workflow Step by Step
Let’s get practical. Here’s the typical flow for a video face swap API call.
Authentication
Almost every production API uses bearer token authentication. You’ll receive an API key at registration, and you pass it as a header:
Authorization: Bearer YOUR_API_KEYThis is standard practice and aligns with security guidelines from resources like the OWASP REST Security Cheat Sheet. A few things worth doing at the start:
- Store your API key as an environment variable, never hardcoded in your codebase
- Set up key rotation — . Most APIs let you regenerate keys without losing account access
- If available, use scoped keys that only have the permissions your integration actually needs
Sending the Request
A typical requested body looks something like this:
{
  "source_image_url": "https://your-storage.com/source-face.jpg",
  "target_video_url": "https://your-storage.com/target-video.mp4",
  "output_format": "mp4",
  "quality": "high"
}
Some APIs accept binary file uploads directly via multipart form-data. Others only accept URLs pointing to publicly accessible files. Check your API docs carefully on this — it’s a common source of silent failures where the API returns 200 but processes nothing because the file URL was inaccessible.
For longer clips, you’ll typically get back a job ID rather than the output directly:
{
  "job_id": "fswap_a3b92f",
  "status": "processing",
  "estimated_time_seconds": 45
}
Output Handling
Poll the job status endpoint or configure a webhook to receive the result when processing completes. The response will include a download URL for the processed video. These URLs are typically time-limited — download and store the output to your own storage within the expiry window, which is usually 1–24 hours depending on the provider.
Don’t assume the output is perfect just because the status is completed. Always spot-check a few frames. Status completed means the pipeline ran without crashing. It doesn’t mean the swap looks good.
For production systems, building a solid REST API integration around these async patterns — proper error handling, retry logic, webhook verification — will save you a painful debugging session later.
Common Failure Modes and Fixes
Here’s where things get real. I’ve hit all three of these.
Motion Glitches
What it looks like: The swapped face jitters or “pops” between frames, a problem very similar to issues discussed in guides on how creators fix flicker and jitter in AI-generated video.
Why it happens: Frame-by-frame processing without temporal smoothing. Each frame is solved independently, so slight variations in landmark detection create inconsistency.
Fix: Switch to a temporal-aware model if available. If you’re locked into a frame-by-frame API, some providers offer a post-processing stabilization pass — look for that in your options. Alternatively, pre-processing your input video with motion stabilization before sending it to the API can help.
Identity Drift
What it looks like: The output face gradually starts looking less like the source and more like some blend of source and target — or just an average-looking nobody.
Why it happens: Usually a source image quality issue. If the source face photo is low-resolution, poorly lit, or captured at a non-frontal angle, the model can’t extract reliable identity features. It fills in the gaps with whatever it can infer, which often wanders toward the target face.
Fix: Use a higher-quality source image. Frontal, even lighting, at least 512×512px in the face region. This single change resolves identity drift in maybe 80% of cases in my experience.
Lighting Mismatch
What it looks like: The swapped face looks “pasted on” — the lighting direction or color temperature of the face doesn’t match the surrounding scene.
Why it happens: The blending model tries to harmonize lighting but can only do so much. Large differences between the lighting in the source image and the target video challenge the compositing step.
Fixes:
- If you have control over the source image, shoot it in lighting conditions similar to your target footage
- Some APIs offer explicit lighting normalization as a parameter — turns it on
- For severe mismatches, post-processing the output with a color grading pass can help blend the face into the scene more convincingly
So what’s the bottom line?
Video face swap is genuinely powerful technology when you understand what it needs to succeed. Most of the quality problems aren’t mysterious — they trace back to input quality, model selection for the use case, and realistic expectations about what the pipeline can and can’t handle. Get those right, and you’ll spend a lot less time debugging outputs that looked fine in the demo but fell apart in production.
Related Articles

WAN 2.7 First & Last Frame Control: Builder Guide
WAN 2.7 vs WAN 2.6: Feature Diff & Upgrade Decision

Best AI People Remover From Photos in 2026: Remove Unwanted People Instantly
Best Fotor Alternative in 2026: WaveSpeedAI for AI Image Generation & Editing

Best Free Audio Converter in 2026: Convert MP3, WAV, FLAC, AAC Instantly