Z-Image LoRA: What It Means and When You Need It (Beginner-Friendly)
Notes from a short Z-Image LoRA run: data size, captions, strength, and how much consistency you really gain in practice.
Hi, my friends. Dora is here. I didn’t plan to train anything last week. I just wanted a consistent little helper, an illustrated character to sit in the corner of my screenshots. Prompts kept getting me close, then drifting. Eyebrows changed. Colors slipped. On Tuesday (Jan 13, 2026), after a few near-misses, I tried Z-Image LoRA. I expected a rabbit hole. It was more like a short hallway.
This isn’t a victory lap. It wasn’t instant. But the setup removed enough friction that I stopped thinking about settings and started thinking about my images. Here’s what clicked, what didn’t, and when you probably don’t need a LoRA at all.
Z-Image LoRA in one minute
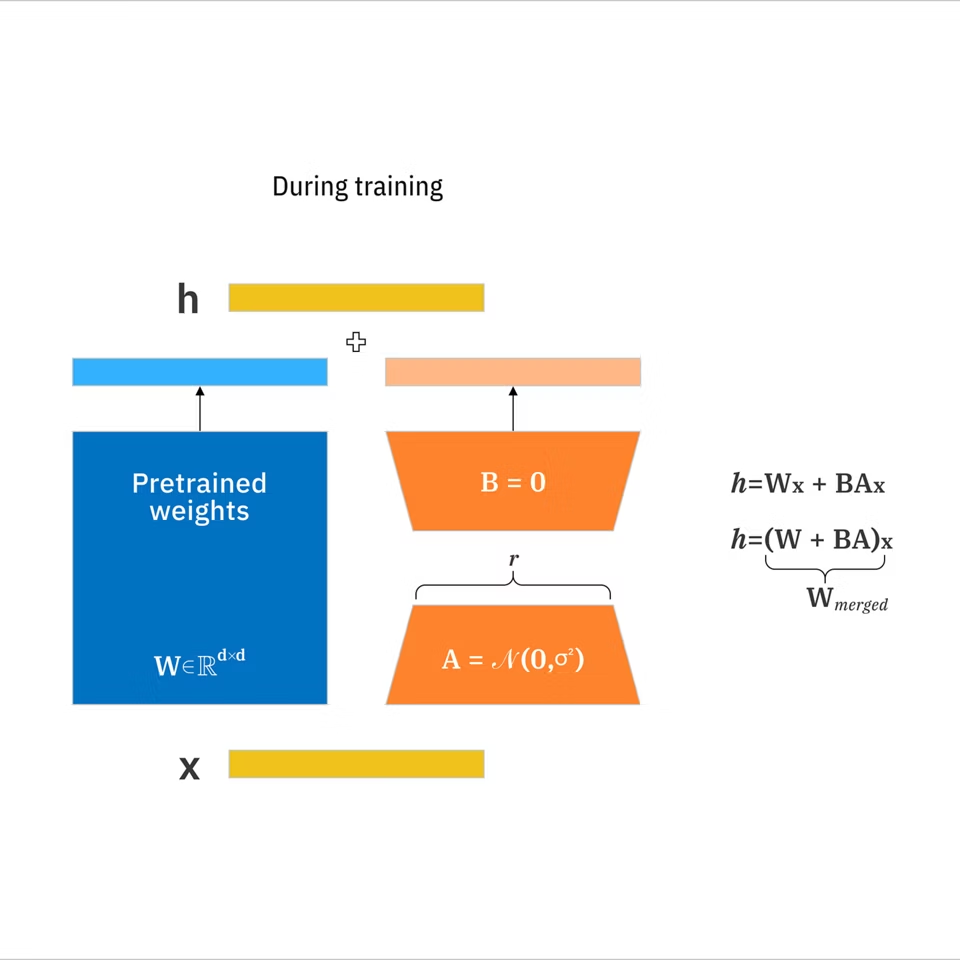
A LoRA (Low-Rank Adaptation) is a small add-on you train on top of a base image model to push it toward a specific style or subject without retraining the whole model.
 What Z-Image LoRA (Beginner-Friendly) does well:
- Hides the scary knobs. You still choose a few basics (images, captions, target), but the defaults are sane.
- Trains fast enough to iterate. My first pass (10 images) took about 12–18 minutes on a mid-range GPU.
- Loads like a layer. You toggle it on in your generation tool and prompt like normal, plus an optional trigger word.
What you get: a tiny file that nudges the model when you need consistency, logos, a character, a brushy watercolor look, without locking you in. If you don’t turn it on, the base model behaves as usual.
When you do NOT need LoRA
I say this with love: a lot of us reach for training too fast. A few cases where I don’t bother:
- The base model is already close. If a short prompt with a reference image gets you 8/10 results you can use, you’re done. An IP-Adapter or image prompt may be enough.
- You need variation, not consistency. If each output should wander, a LoRA can over-steer.
- One-off visuals. For a single banner, I’ll spend five extra minutes prompting rather than set up training.
- The constraint lives in composition, not identity. Tools like ControlNet or pose guidance shape layout without teaching the model a new concept.
A quick test I use: if a simple seed sweep and 2–3 prompt tweaks can’t hold the element I care about (same character, same logo proportions) across five images, that’s when I consider a LoRA. Otherwise, I keep it simple.
When LoRA helps
I felt the difference most in two situations this week (Jan 2026):
- A small mascot I wanted to reuse across docs. Prompts kept wobbling the eyes and shirt color. After a short LoRA, those stabilized, and I could focus on poses and backgrounds.
- A soft pencil texture for diagrams. I could prompt “pencil sketch,” but the shading changed every time. A 15-image style LoRA gave me a steady line quality without pinning content.
Signals that a LoRA will likely help:
- You need the same subject across many scenes.
- A specific art texture matters (crosshatch, risograph dots, thick gouache edges) and keeps drifting.
- You want to reduce prompt gymnastics. After training, my prompts dropped from 80–100 tokens to 30–40. The mental effort fell more than the time.
What caught me off guard was how quiet the impact felt. No dramatic before/after. Just fewer retries, fewer “almosts.”
Data requirements
 I kept this simple and it worked better than I expected. A few notes from two short runs last week:
Quantity
- Character/subject: 8–20 images can be enough if they’re varied (angles, lighting, mild outfit changes). I used 12.
- Style/texture: 10–30 images that share the same look but different content. I used 15.
Quality
- Resolution: feed images that roughly match your generation size. If you plan to generate at 1024, don’t train on tiny 256 crops.
- Variety beats volume: Five copies of the same pose teach the model very little and nudge it toward overfitting.
- Clean backgrounds help for characters: Busy scenes blur the signal.
Captions
- Short and literal: “a small blue mascot with round eyes, red shirt,” “pencil sketch, crosshatch, soft shadow.”
- Be consistent with naming. If you invent a unique name for a character (like “mori-kiko”), use it in every caption so you can trigger it later.
- You can start with auto-captions, then lightly clean them. I cut adjectives that didn’t reflect the core idea.
Process I used
- 12 subject photos (front/three-quarter/side), neutral backgrounds.
- 15 style frames from my own diagrams, same paper texture.
- One pass, default rank, light regularization. Training time: ~16 minutes on a rented A10G. Setup: ~10 minutes. The second run used 20% fewer steps and held up fine.
If you only remember one thing: fewer, clearer images beat large, noisy folders.
Style vs character LoRA
I used to lump these together. They behave differently.
Character/subject LoRA
- Goal: teach a specific identity (a person, mascot, product).
- Data: consistent subject, varied contexts: face close-ups if facial identity matters.
- Prompts: keep the trigger name plus a short description. Let the LoRA handle identity: you steer pose/scene.
- Risks: overfitting to outfits or backgrounds. Mix them.
Style/texture LoRA
- Goal: teach a surface quality (line work, palette, brush stroke, grain).
- Data: many different subjects, one style.
- Prompts: no trigger name needed, but a simple marker helps (“sketchline style”).
- Risks: style swallowing content. If everything becomes the same mushy painting, reduce strength.
Strength and mixing
- Most tools expose a LoRA weight. I rarely go above 0.8 for characters or 0.6 for styles. Small nudges matter.
- You can stack two LoRAs (one style, one character). I had the best results when one was dominant and the other stayed under 0.4.
I learned to think of character LoRA as “who” and style LoRA as “how.” Simple, but it keeps me from blaming the wrong thing.
Common myths
A few claims I bump into a lot, and what I actually saw:
- “You need hundreds of images.” I trained a usable character with 12. More helps, but only if they’re varied and clean.
- “It takes hours.” With a modest GPU and a beginner preset, my runs landed under 20 minutes. Heavy, custom configs can take longer.
- “LoRA replaces prompt engineering.” It reduces fiddling but doesn’t remove it. I still prompt for composition, lighting, and mood.
- “One LoRA fits all models.” Not always. A LoRA trained on one base can transfer okay to a sibling model, but results shift. I treat them as related, not interchangeable.
- “Higher strength = better.” Past a point, images collapse into sameness. If details smear, back the weight down.
- “Auto-captions are fine unedited.” They’re a good start. I still trimmed weird adjectives (“ominous,” “cinematic”) that weren’t part of the concept.
None of this is magical. It’s small, repeatable tweaks that compound.
Quick glossary
- LoRA: A compact set of learned weight updates that adapts a large model toward a target concept without retraining everything. According to IBM’s LoRA documentation, it can reduce trainable parameters by up to 10,000 times compared to full fine-tuning.
- Base model: The foundation you generate from (what you load before any LoRAs).
- Rank (r): A setting that controls how expressive the LoRA is. Higher rank can capture more nuance but may overfit and bloat size.
- Weight/Strength: How strongly the LoRA influences generation at inference time.
- Trigger word: A unique token you use in prompts to call a subject LoRA (e.g., the made-up name you used in captions).
- Overfitting: When the model memorizes training images and stops generalizing. Shows up as near-duplicates.
- Regularization: Techniques or extra data to prevent overfitting.
- UNet/Text encoder: Parts of the model that handle images and text. Some trainings update both: beginner presets often touch the image side more.
- Caption: The text paired with each training image.
- Checkpoint: A saved state of a model or LoRA.
If any of these feel foggy, you can still train. The beginner preset is designed to keep you out of trouble.
Next steps on WaveSpeed
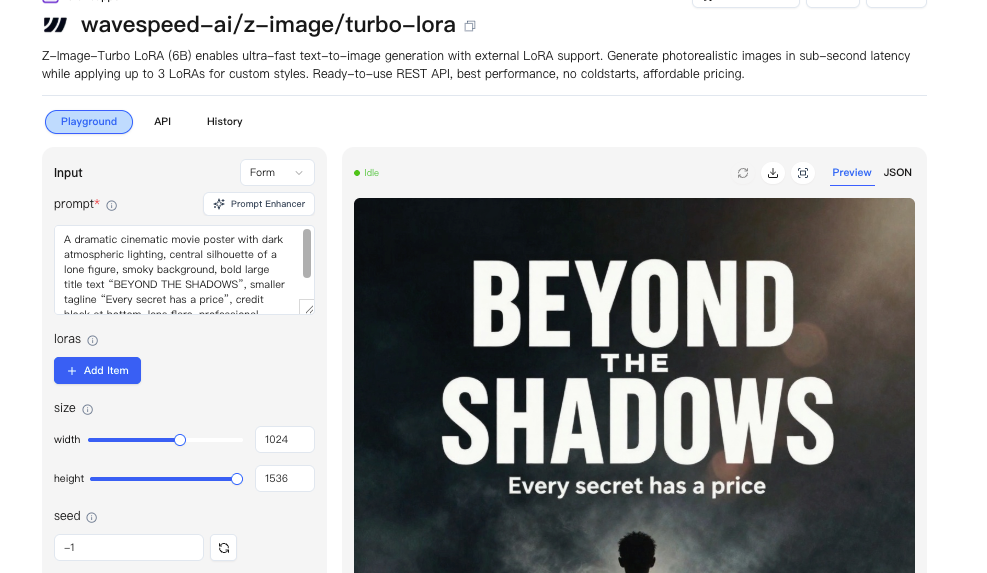
I used the beginner-friendly path on WaveSpeed to run Z-Image LoRA without chasing settings. The flow was calm:
- Pick a base model.
- Drop in 8–20 images and short captions.
- Choose “style” or “character.”
- Start training and make tea.
- Load the LoRA for generation and try two weights (0.4 and 0.8) to feel the range.
What helped most was treating the first run as a sketch. I looked for two things: did identity hold across five prompts, and did the style keep its texture without swallowing content? If one failed, I adjusted the dataset, not just the sliders.
If you’re dealing with the same constraints, drifty characters, wandering textures, it’s worth a look. This worked for me: your mileage may vary.
This is exactly why we built WaveSpeed. When characters drift, styles wobble, and prompts turn into gymnastics, we wanted a calmer way to get consistency without over-engineering. On WaveSpeed, we run Z-Image LoRA with a beginner-friendly flow—clear defaults, fast iteration, and just enough control to keep identities and textures stable, so you can spend less time retrying and more time actually making images.
→ Train a simple LoRA on WaveSpeed
 A small note I’m keeping for myself: the fewer words I fight in the prompt, the more attention I have for the image in front of me. That’s the part I don’t want to automate away.
Related Articles
ChatGPT Codex Model vs Media Generation Models

LTX 2.3 API and Local Workflow for Builders

Claude Fable 5 Just Shipped: 80.3% on SWE-Bench Pro, 2× Opus 4.8 Pricing, Free Through June 22

How to Choose an AI Media API for Codex Apps (2026)

Hunyuan 3D API: What Builders Should Know