How to Use Z-Image Turbo Online: Settings That Actually Improve Quality

I’m Dora. That day, a friend sent me a short clip and said, “This came out of Z-Image Turbo.” The name made me roll my eyes a bit. But later, when I needed to turn a single still into a quick motion test, I opened a tab and tried it. That was in early January 2026. I’ve used it most days since, in small, boring ways that make work feel lighter.
This isn’t a full tour. Think of it as notes from the trenches. It’s the handful of decisions that actually shape results. If you’re wondering how to use Z-Image Turbo Online without getting lost in the knobs, here’s what mattered most for me: a few settings, a seed habit, and a simple way to think about motion vs. stability.
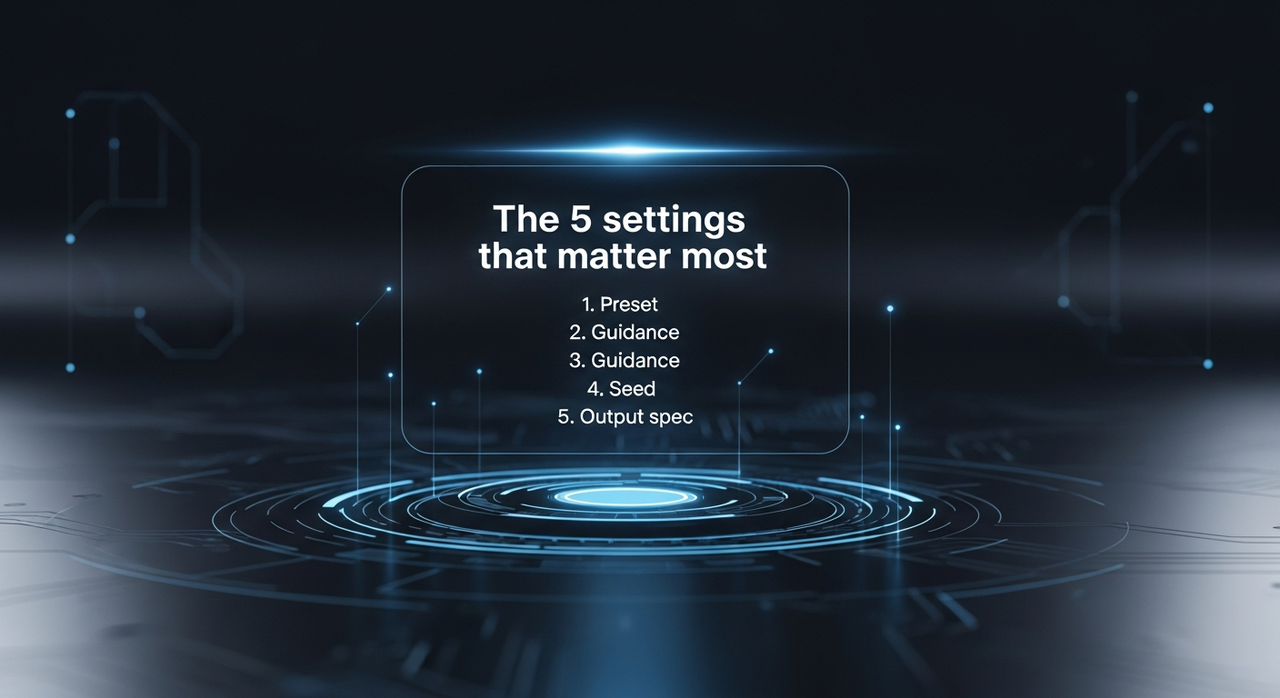
The 5 settings that matter most
 When I first opened Z-Image Turbo Online, the panel looked familiar: presets, resolution, seed, guidance, motion strength. Lots of places to fiddle. I tried fiddling. Then I backed up and watched what really moved the needle. Too familiar, honestly.
For my work, these five settings did most of the lifting:
- Preset (Fast / Balanced / Quality)
- Motion strength (or whatever it’s called in your version: it’s the slider that decides how much the image can shift frame to frame)
- Guidance (how strongly the tool obeys a prompt or sticks to the source image)
- Seed (for repeatability)
- Output spec (resolution, fps, and duration together)
A few notes from week one:
- Preset picks your default trade-offs. I used to ignore presets and tweak everything. Here, the presets set a tone that the other sliders nudge rather than replace.
- Motion strength has a “just enough” zone. Too low and the clip feels like a screensaver. Too high and faces drift or fabrics melt. My steady zone landed around the low-middle for portraits and one notch higher for product spins.
- Guidance acts like a seatbelt. Tighten it when you care about identity or typography. Loosen it when you want dynamics or texture.
- Seeds are a sanity trick. When a result had the right vibe but the wrong detail, I kept the seed and adjusted one setting at a time. It saved me from wandering.
- Output spec is one decision. I stopped treating resolution, fps, and duration as separate. The combo has a shared cost in time and compute. I pick one “budget” and work within it.
I didn’t reach these in one day. There were… some questionable clips. I made a few chaotic clips first. But once I centered on these five, the rest became seasoning, not core ingredients.
Presets: Fast / Balanced / Quality
 I didn’t expect the presets to matter. They did. Annoyingly so. Over the last two weeks, I used each one for real tasks:
- Fast for rough direction: storyboards, motion beats, mood refs.
- Balanced for things that might ship as-is: social loops, internal demos.
- Quality when edges, skin, or type needed to hold up on a bigger screen.
Field notes:
- Fast shaved minutes off each render on 720p, 12–15 fps, 3–5 seconds. It also introduced tiny flickers in line art and micro stutter in gradients. For draft work, I didn’t care. For anything public, I noticed.
- Balanced became my default. It gave me 80–90% of the look of Quality at about 60–70% of the time cost. On product shots with clean lighting, it was enough.
- Quality helped with fragile things: hands, earrings, thin serifs, and fabric weave. It also exaggerated any weirdness in my prompt or source. Garbage in, glossy garbage out.
One small habit: I start in Fast for framing, jump to Balanced once I like the motion, and only switch to Quality if I’m still seeing crawl in fine details. That simple ladder kept me from over-investing too early.
If you’re on a deadline, Balanced is a safe first stop. If you’re exploring style, Fast lets you take more swings before lunch.
(For deeper preset and parameter examples, check this ComfyUI workflow guide or this prompting breakdown.)
How to tune for motion realism vs stability
This is the part that made me slow down. Z-Image Turbo will happily move things. The question is: how much, and in what way, before it breaks the thing you care about?
Here’s the frame that helped me think about it:
- Stability lives in identity: faces, logos, type, product edges, brand colors.
- Realism lives in micro-variation: hair, cloth, reflections, small shifts in light and shadow.
You can’t max both. So I tuned them like a seesaw:
- For portraits and talking heads: lower motion strength a notch below the midpoint, raise guidance slightly, and keep fps at 24 or under. I also locked the seed. The result: eyes didn’t drift, mouth corners didn’t flutter, and skin texture looked alive without swimming.
- For texture and mood clips (clouds, water, fabric): higher motion strength, slightly lower guidance, and a softer fps (15–20) often looked more “film-y” than 30 fps. The movement felt natural instead of hyper-smooth.
- For product loops: mid motion strength, higher guidance, and short durations (3–4 seconds). Longer loops invited artifacts. Short loops stayed crisp.
A practical note: if you’re seeing “breathing” edges (logos pulsing, lines growing), that’s usually motion strength plus either low guidance or too many frames. Dial one back, not all three. When I changed too much at once, I lost the thread and had to start over.
Seed strategy for repeatability
Seeds are the quiet hero here. I didn’t care about them at first. Then I needed to recreate a result after a teammate asked for “the same clip, just slower.” Without the seed, I couldn’t land it.
What worked for me:
- Pick a seed early. As soon as a clip feels close, lock the seed and name the file with it. I use a simple pattern: subject-preset-seed-v1.
- Change one setting at a time. With a fixed seed, you can learn what each slider actually does. It sounds basic, but it turns the tool into a lab instead of a slot machine.
- Keep a small seed library per project. I have a note with three seeds that behave well for portraits, and two for abstract textures. When I’m stuck, I swap in a “steady” seed before I rewrite the prompt.
In practice, this cut my iteration time by about a third. More important, it lowered the mental load. I wasn’t chasing ghosts: I was running controlled experiments. If you’re collaborating, sharing the seed means someone else can pick up your work and get similar behavior. That’s rare in these tools, and it matters.
Resolution, fps, and duration trade-offs
I used to think of these as output choices. Z-Image Turbo reminded me they’re creative choices too.
Resolution
- 720p is fine for drafts and mobile-first posts. It renders fast and surfaces issues early.
- 1080p is my default for anything public. It shows edge problems without overcommitting.
- 4K only made sense when the source had enough detail and the motion was subtle. Otherwise, it amplified artifacts I didn’t notice at lower res.
Frames per second (fps)
- 12–15 fps gives a stylized, stop-motion feel. It hides minor flicker well.
- 24 fps reads as natural for most subjects.
- 30 fps can feel “too smooth” and exposes tiny wobble. I use it when motion is minimal and I need clean pans.
Duration
- 3–4 seconds is a sweet spot for loops and social cutaways. Less time for the model to drift, easier to repeat.
- 6–8 seconds works for narrative beats but requires tighter settings to avoid breathing edges.
- Beyond 10 seconds, I only continue if I’ve already proven the look in a shorter run.
The trade-offs link together. Higher resolution + higher fps + longer duration is three ways to invite artifacts and slow renders. I pick two, rarely three. For example, if I need 1080p at 24 fps, I keep duration short. If I need 8 seconds, I drop fps to 20 and keep motion strength low.
Time-wise, Balanced at 1080p/24 fps/4 seconds usually returned in a couple minutes for me this month. Quality doubled that. Your numbers will vary, but the ratio held steady.
Managing multiple renders, tracking seeds, and iterating efficiently used to be my biggest headache. That’s why we built Wavespeed—our own platform lets me batch generations, lock seeds across clips, and control output specs without losing mental bandwidth. Using it, I can keep Z-Image Turbo work smooth, stress-free, and consistent every time. Try it free →
Common “bad settings” patterns
I ran into the same mistakes enough times that I now recognize them on sight. So you don’t have to. If your clips look off, check for these patterns:
- Over-eager motion: Faces drifting, earrings melting, logo edges pulsing. Fix: lower motion strength one notch, raise guidance a touch, or shorten duration. Don’t do all three at once.
- Over-smoothing with high fps: 30 fps making minor shimmer obvious. Fix: drop to 24 or even 20 fps: the “film” feel hides micro-variance.
- Quality too early: Spending time and compute before the idea is set. Fix: rough in Fast, shape in Balanced, finish in Quality only if the detail calls for it.
- Ignoring seeds: Getting a great look and losing it. Fix: when a run works, copy the seed forward. Treat it like lighting notes on a set.
- Mismatched output budget: 4K, 30 fps, 10 seconds. It will show every flaw and slow you down. Fix: pick two priorities and keep the third modest.
If you’re just getting started and wonder how to use Z-Image Turbo Online without hitting these potholes, try this baseline:
- Preset: Balanced
- Motion strength: a hair below mid
- Guidance: a hair above mid
- Seed: fixed (any number: keep it)
- Output: 1080p, 24 fps, 4 seconds
It’s not magic, but it’s a steady starting point. From there, tweak like a grown-up. From there, change one thing and watch what moves.
For more technical details about Z-Image Turbo’s architecture and distillation process, check out the official Z-Image GitHub repository.
Related Articles

GPT-5.4 for Developers: What the Leaked Signals Mean for AI Workflows

SkyReels V4 Use Cases: 6 Ways Creators Can Use It Right Now

GPT-5.4 Release Date: What the Signals Say

GPT-5.4 vs GPT-5.3: What Might Actually Change