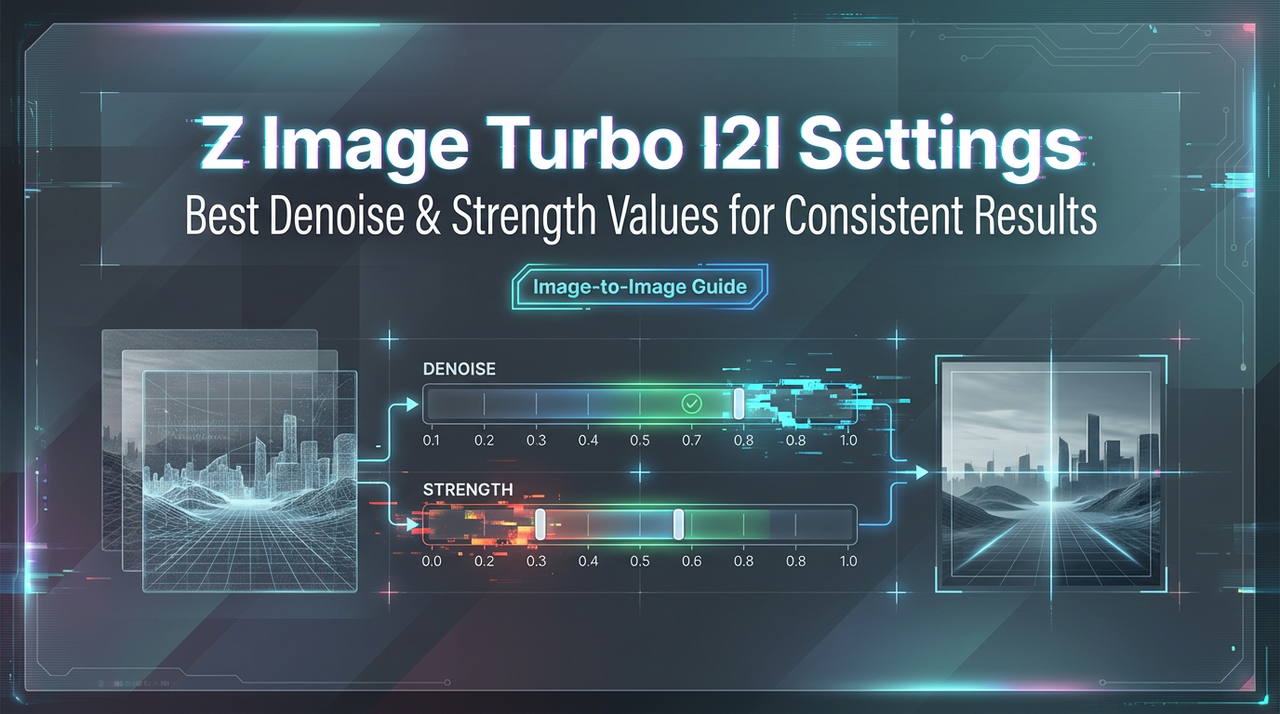
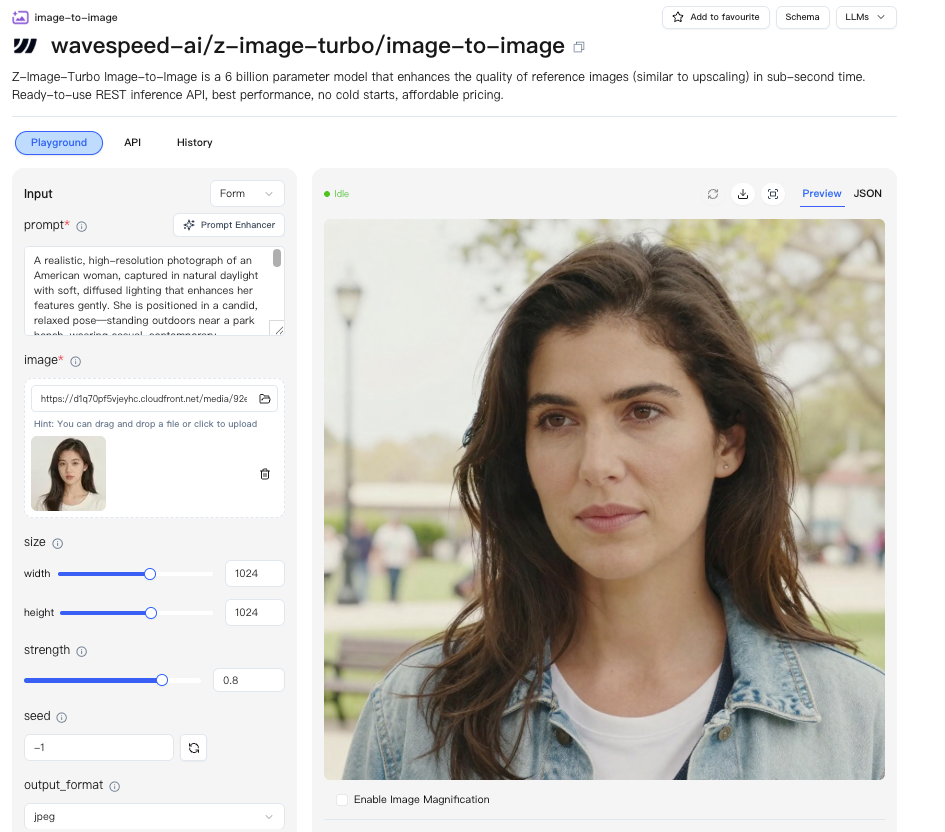
Z-Image Turbo Image-to-Image: Best Denoise/Strength Values for Consistent Results
Hello, I’m Dora.
That day, I ran into a small snag: I had a sketch I liked and needed three variations for a client deck, same layout, different mood. My usual setup either copied too closely or wandered off. I kept hearing about Z-Image Turbo Image-to-Image, so last week (January 2026) I tried it in a few real tasks. Nothing dramatic. Just steady passes, exporting drafts, nudging parameters, watching what changed and what didn’t.
What stood out wasn’t speed or flash. It was how the denoise/strength setting behaved. Subtle, but it decided whether the model respected my source image or treated it like a vague suggestion. These are field notes from those runs: what strength/denoise actually does in Z-Image Turbo Image-to-Image, ranges that felt sane, a small consistency recipe, where negative prompts helped, where things broke, and a simple way to test without burning an afternoon.
What strength/denoise does
The strength (sometimes called denoise) in Z-Image Turbo Image-to-Image controls how much the model “forgets” the source image on each pass. Low strength means light touch, your edges, pose, and composition mostly stay. High strength means creative license, style changes land harder, and structure gets flexible.
Here’s how it felt in practice:
- At low values, I saw precise preservation of layout and rough shapes. Texture changed nicely, color grading, lighting tweaks, material shifts, but the bones stayed put. Good for polishing.
- Mid values started to reinterpret surfaces. It was enough to nudge style (ink vs. paint, glossy vs. matte) and lighting direction without losing the subject. This was my default zone.
- High values were great when I wanted a fresh take from the same prompt, using the source only as a ghost. Faces and hands drifted more. Backgrounds reflowed. Sometimes that’s what you want: often it isn’t.
A small moment: I pushed strength higher, thinking I’d “get more style.” Instead I lost the clean silhouette the deck depended on. Dialing strength down did more for style consistency than any clever prompt tweak. The tool reminded me, respect the source if you care about the frame.
Recommended ranges
I’m cautious about hard numbers because every model build is a little different, but here’s what worked for me with Z-Image Turbo Image-to-Image (tested on 768–1024px sources, standard sampler, default CFG):
- 0.15–0.25: Polishing zone. Keep pose and layout almost exactly: change finishing. Color grading, subtle texture, cleaner edges. Good for product shots or slides where alignment matters.
- 0.30–0.45: Controlled restyle. Maintain structure: shift vibe. Move from flat to painterly, adjust lighting direction, push palette. This was my everyday range.
- 0.50–0.65: Bold reinterpretation. Pose and scene hold loosely. Great for concept exploration or thumbnails when you only need rough continuity.
- 0.70+: New idea with a memory. The source becomes a suggestion. Useful when you’re stuck, risky when you need consistency.
3 use cases (style/pose/fix)
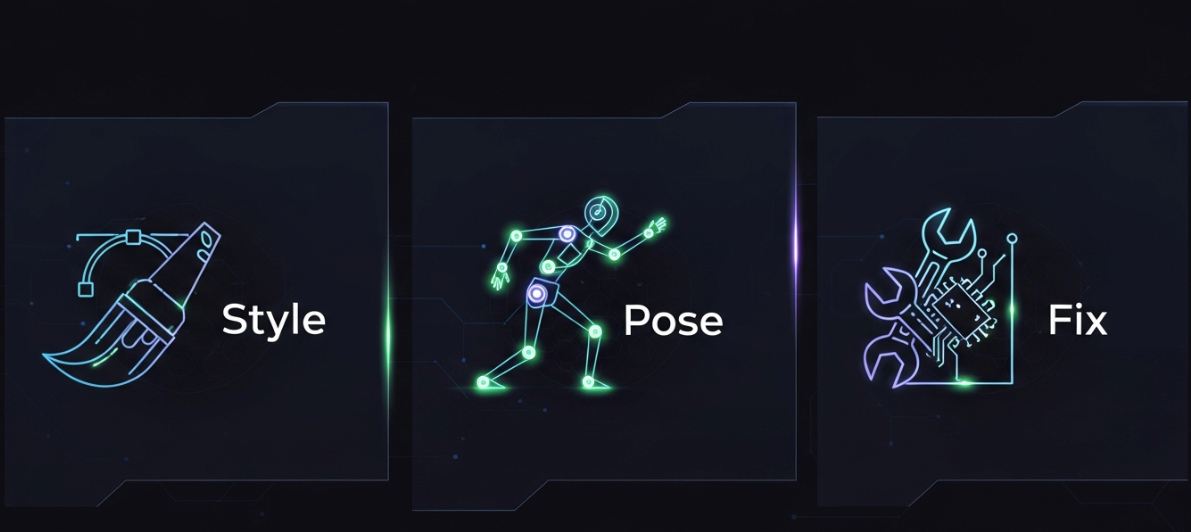
1. Style
I had a flat vector mascot that needed a “print texture” look, paper grain, slight ink bleed, muted palette. With Z-Image Turbo Image-to-Image at 0.35 strength and a short style prompt, it kept the character’s edges and added believable material. First run looked a bit too noisy. I lowered strength to 0.28, and the grain settled into the shadows instead of the highlights. It didn’t save me time on the first attempt, but over three variations I felt my mental load drop, no masking, no manual grain overlays.
What helped:
- Short prompts beat poetic ones. The model reacted better to “risograph-style, soft paper grain, muted CMYK” than to airy adjectives.
- Keep the source crisp. A blurry input gave me muddy grain.
2. Pose
I needed alternate angles of a character while keeping the body language. With strength around 0.40 and a few prompt hints (camera angle, lens), I could rotate the scene about 15–25 degrees without melting anatomy. Pushing to 0.55 made it adventurous, sometimes charming, sometimes wrong. I noticed that a light line-art pass over the source, just the silhouette and major folds, anchored the pose better than a fully shaded input.
What helped:
- Sketchy sources preserve intent. The model respects lines.
- If hands break, lower strength first, then adjust guidance. Fixing inpaint is last.
3. Fix
I used Z-Image Turbo to clean up a product composite: better reflections, less glare, smoother edges. This was where low strength shined. At 0.18–0.22, the tool behaved like a smarter filter, kept geometry, smoothed artifacts, and nudged lighting coherence. When I went above 0.30, it started inventing background detail I had to paint out later.
What helped:
- Add a negative prompt for “extra objects, text, logo variations” so it doesn’t hallucinate packaging.
- Run two quick passes instead of one heavy pass when you want safe fixes.
Consistency recipe
When I needed to generate multiple image-to-image variations without losing layout consistency, this was exactly the workflow we built WaveSpeed for. Instead of juggling local setups or rerunning experiments blindly, I could iterate with fixed seeds, compare strength ranges, and keep my source image respected across variations.
→ Try Z-Image Turbo Image-to-Image on WaveSpeed
 This is the small setup I used when I needed a series to feel related without being clones. Not fancy, just things that reduced jitter.
Recipe (January 2026 runs):
- Strength: 0.30–0.38 for restyle, 0.18–0.25 for polish.
- Seed: Lock it for each variant set. Change only when you want a new branch.
- Guidance (CFG): Moderate (5–7). High values pulled too hard toward adjectives and away from the source.
- Prompt: One tight descriptor stack (materials, lighting, palette) and one short scene cue. No metaphors.
- Input: Clean edges, consistent resolution. I upscaled sources to the same longest side before generating.
- Sampler/steps: Default sampler with modest steps worked fine. Extra steps past the default gave diminishing returns: I only pushed them when banding showed up.
Process notes:
- Iterate like a designer, not like a slot machine. Change one variable at a time. Save A/Bs side by side.
- If the model keeps drifting, lower strength before you fight the prompt. It’s usually a respect issue, not a vocabulary issue.
- When a run hits the right texture but wrong color, keep the seed and change palette terms. When it hits pose but wrong texture, keep strength and swap the style stack.
Negative prompts
Negative prompts didn’t feel like a magic wand here: they felt like guardrails. I used them to prevent small, persistent artifacts.
What worked:
- For product shots: “extra labels, duplicated logos, random text, additional reflections, chromatic aberration.” Cleaned up hallucinated stickers and ghost highlights.
- For characters: “extra fingers, extra limbs, messy pupils, asymmetrical eyes.” It didn’t fix every anatomy slip, but it reduced the frequency.
- For scenes: “floating objects, busy background, posterization.” Helped keep the backdrop from overfilling at mid/high strength.
A pattern: negatives are more effective when strength is already sensible. If strength is too high, negatives start to feel like trying to steer ice with a toothpick.
Failure modes
A few predictable places where Z-Image Turbo Image-to-Image pushed back:
- Over-stylization drift: At strength >0.55 with descriptive prompts, the tool prioritized mood over anatomy. Hands and text took the hit first. Fix: lower strength, trim adjectives, raise input resolution.
- Texture inflation: Asking for “grainy, gritty, distressed, filmic” stacked texture terms. It compounded into speckled shadows and banding. Fix: choose one texture family, keep it short.
- Face uncanny valley: Small facial shifts across a set made a character look like cousins, not the same person. Fix: lock seed, keep strength under 0.35, and, if needed, do a light face-specific pass.
None of this is unique to Z-Image Turbo, but the thresholds mattered. I learned to treat strength as the primary dial and prompts as seasoning, not the other way around.
Mini test grid method
 When I don’t know where to land, I run a tiny, boring grid. It saves me from chasing my tail for an hour.
Here’s the grid I used for Z-Image Turbo Image-to-Image last week:
- Fix the seed, sampler, and resolution. Keep the prompt very short, a materials line and a palette line.
- Make a 3×2 grid: three strengths (0.22, 0.34, 0.48) across, two CFGs (5 and 7) down. That gives you six images that map the space quickly.
- Pick the cell that best respects the source while hitting the style. If none fit, adjust only one axis. Example: try 0.28, 0.38, 0.44 with the same CFG.
- When you find the right cell, riff inside it. Keep strength fixed and vary one descriptive term or palette. Save as a set.
Timing: This took me ~12–15 minutes per concept at 768–1024px on a modest GPU. The point isn’t speed: it’s making fewer blind stabs.
Small cue: label outputs with strength-CFG in the filename. When a client says “the second one,” you’ll know what levers to replay.
Did you also swear up and down that you’d “just tweak the strength to change three moods,” only to accidentally push it to 0.6 and have every character go into “family drift” mode?
Quick, throw your sketch into Z-Image Turbo Image-to-Image and try out the denoise feature.
Related Articles

GPT-5.4 for Developers: What the Leaked Signals Mean for AI Workflows
SkyReels V4 Use Cases: 6 Ways Creators Can Use It Right Now
GPT-5.4 Release Date: What the Signals Say

GPT-5.4 vs GPT-5.3: What Might Actually Change