Install LTX-2 in ComfyUI on Windows: CUDA Setup & First Run Guide
Hi, I’m Dora. That day, I just wanted a quick text‑to‑video pass for a sketch, and I kept seeing LTX‑2 mentioned in ComfyUI threads. By mid‑morning I was staring at a blank graph and a folder called “ltx,” wondering if I’d just signed up for driver roulette again.
I took notes while I set it up on Windows 11. If you’re searching for “ltx‑2 comfyui windows” because you’re mid‑install, I’ve been there. Here’s what helped.
Pre-Install Checklist (GPU / CUDA / driver versions)
A quick check before you start saves you the hour you’ll spend chasing DLL errors later:
- GPU: An NVIDIA card with at least 12 GB VRAM made LTX‑2 usable for me at modest settings (512–768 width, short clips). 8 GB can work with very conservative settings, but it’s tight and often frustrating.
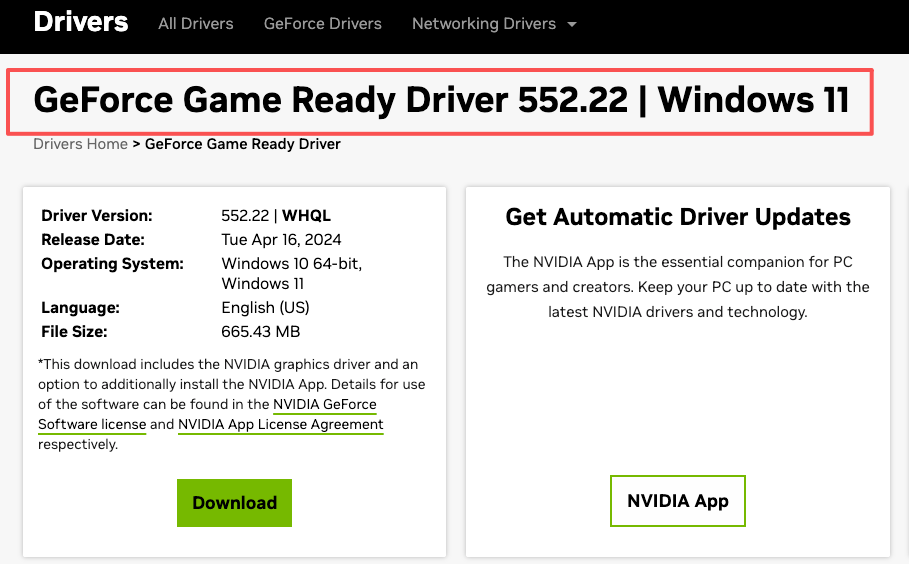
- Drivers: Update to a recent Game Ready or Studio driver (I used 552.xx).
- CUDA: You don’t install a full CUDA toolkit for ComfyUI portable. You just need the runtime DLLs that ship with PyTorch. This is why matching the PyTorch+CUDA build matters (cu121 or cu122, etc.).
- Python: The ComfyUI portable build ships with its own Python. If you run a custom venv, keep it aligned with the PyTorch wheel you choose.
- VC++ Redistributable: Install/repair the latest Microsoft Visual C++ Redistributable. It’s a quiet fix for “procedure entry point” style DLL errors.
Two sanity checks I do before any heavy model:
nvidia-smiruns in a terminal and shows the driver cleanly.python -c "import torch: print(torch.version, torch.cuda.is_available())"returns True for CUDA in whatever environment ComfyUI will use.
None of this guarantees smooth sailing, but it narrows the failure modes.
Update ComfyUI to LTX-2-Ready Version
What I did:
- Update ComfyUI first. If you’re on the portable build from GitHub, grab the latest release or git pull and run the update scripts.
- Open ComfyUI Manager (if you use it) and update core dependencies. I let Manager rebuild the venv when prompted.
- Install the LTX‑2 node pack from its official repo. The name varies (I’ve seen “ComfyUI-LTXVideo”/“LTX‑Video” style repos): I used the one linked from the model’s official page. If a repo description says it supports LTX‑Video v2/LTX‑2, that’s the one you want.
Why this matters in practice:
- LTX‑2 leans on PyTorch 2.3+ features and CUDA 12.x builds. Mixing old torch (cu118) with new nodes is a fast way to hit cryptic import errors.
- Some packs expose FP8/BF16 toggles differently. Matching the node pack and ComfyUI version avoids mismatched inputs and dead‑end graphs.
I resisted the fresh install at first, it felt unnecessary. Then I compared: the new build started first try; the older one kept asking for missing ops. I didn’t miss the guesswork.
Model File Placement (step-by-step)
This is where I usually lose time. Different nodes expect different folders. Here’s what worked for me with the LTX‑2 node pack I installed, and the general pattern holds even if your folder names differ.
-
Find the node’s expected paths.
In ComfyUI, open the LTX loader node and hover any file input. Most packs show the relative path they’re scanning (e.g.,models/ltx,models/checkpoints, or a custom subfolder likemodels/ltx_video).
If in doubt, check the repo README. They usually list the exact directory. -
Download the LTX‑2 weights from the official source (often Hugging Face, linked from the model’s page).
You’ll typically get a main.safetensorsor.pthfile plus configs. Some repos split text encoders/VAEs separately; others bundle them. -
Place the files exactly where the node looks.
For my pack:ComfyUI/models/ltx_video/held the primary model file. If your pack saysmodels/checkpoints, use that instead. The name should appear in the node dropdown after a restart or a rescan. -
Optional: text encoder / VAE.
If the node exposes separate inputs for encoders or a VAE, follow its guidance. Many LTX‑2 nodes hide this and bundle components internally. If it’s exposed, put CLIP/Tokenizer files inmodels/clipormodels/text_encodersas instructed by the README. -
Restart ComfyUI.
I know, it’s obvious. But hot‑reloading doesn’t always rescan these folders, and I’ve stared at an empty dropdown more times than I’ll admit.
Small note: if Windows flags the downloaded files as blocked (right‑click > Properties > Unblock), clear that. I’ve had Python refuse to touch “downloaded from the internet” files in stricter setups.
Common Windows Errors (DLL / permissions)
“DLL load failed while importing …” or missing nvrtc64_X.dll
- Cause: PyTorch build didn’t match the CUDA runtime expected by the node pack, or the environment mixed cu118 and cu12x.
- Fix: Reinstall/confirm PyTorch 2.3+ with cu121/cu122 inside the ComfyUI environment. If you run portable, let Manager handle it. Updating NVIDIA drivers helped once.
 “Access is denied” when writing frames/video
 - Cause: I pointed the SaveVideo node at a synced folder with aggressive permissions (OneDrive).
- Fix: Write to a local non‑synced path first (e.g.,
ComfyUI/output/ltx_test). Move the file later.
Long path issues on unzip
- Cause: Windows path length limits plus deep ComfyUI subfolders.
- Fix: Enable long paths in Windows (Local Group Policy or registry) or unzip closer to
C:\.
Antivirus scanning temp frames mid‑render
- Symptom: ComfyUI hang or stutter during encode.
- Fix: Add an exclusion for the ComfyUI folder or just the output temp path.
“Could not find model” even though correct folder
- Fix: Restart ComfyUI. If it still doesn’t show, check the node’s exact expected folder. Some LTX‑2 nodes look in a custom directory name. Match it exactly.
I also ran into the classic “works once, fails the next run.” For me, that boiled down to a browser tab trying to preview the partial MP4 while the encode node was still writing. I switched to writing to a fresh filename per run. The flakiness disappeared.
First Inference Test Workflow
I kept the first graph tiny. Nothing clever, just enough to confirm the pipeline.
What I built:
- A Prompt node with a single sentence (10–20 tokens). Keep it simple.
- LTX‑2 Loader node pointing to the downloaded model.
- An LTX‑2 Sampler/Scheduler node (whatever your pack names it) with low steps.
- A Video Decode/Assemble path that writes frames to a SaveVideo node (MP4, H.264 is fine for a smoke test).
Parameters that didn’t fight me:
- Resolution: 512×288 or 640×360
- Frames: 8–16 frames (0.5–1 second)
- Steps: 6–12
- Guidance/CFG: middle ground (5–7)
- Seed: fixed number (makes troubleshooting less noisy)
- Precision: FP16 (default) unless your node suggests BF16 on Ada: both worked for me, FP16 used less VRAM
What I watch for on the first run:
- VRAM spikes in
nvidia-smi. If you’re pegged at 99% VRAM instantly, drop resolution or frames. - Time to first frame. My first clean run was ~25–40 seconds for 16 frames at 512×288 on a 4070, steps=8. Anything wildly longer usually pointed to CPU encode or an I/O bottleneck.
If your render completes but the video is empty or corrupted, try:
- Writing PNG frames first, then letting a separate node or external tool assemble the video.
- Switching to a different encoder (H.264 vs H.265) or CRF value.
The useful part wasn’t speed, it was seeing one coherent clip. That’s the moment I relax. Then I scale up carefully.
Performance Tuning (batch / precision)
 I didn’t chase benchmark glory. I just wanted settings that stopped me from babysitting memory.
What moved the needle:
- Frames before width. It was easier on VRAM to keep 12–16 frames and bump width to 640 than to jump to 24+ frames. Longer clips rise fast in memory.
- Precision: FP16 worked best on my 4070. BF16 also worked but used a bit more memory. I didn’t gain visible quality from BF16 at these sizes.
- Attention backend: If your pack exposes a toggle for
scaled_dot_product_attention(PyTorch native) vs xFormers, try native first on recent PyTorch. It was more stable for me on Windows. - Batch size: Keep it at 1 for video. Mini‑batches mostly punished VRAM without saving wall‑clock time on my setup.
- Torch compile: Worth testing, but I only saw small gains for longer runs. For short 8–16 frame tests, compile time could eat the savings.
- Mixed IO: Writing to a fast local SSD mattered more than I expected. Slow network folders made the encode phase look like a model problem when it wasn’t.
A simple ladder that didn’t explode VRAM for me:
- 512×288, 12 frames, steps=8
- 640×360, 16 frames, steps=10
- 768×432, 16–24 frames, steps=12–14
If you hit out‑of‑memory:
- Drop frames by 4 before lowering width.
- Reduce steps first if you just need a draft.
- Close other GPU apps (video players, browser with hardware acceleration). Tedious, but it works.
I also tried a tiny tile/patch mode some packs offer. It helped at higher widths but sometimes introduced seams. Good for experiments: not my default.
WaveSpeed Path (no local CUDA needed)
 I tested one run through a hosted path to avoid the GPU shuffle. The idea: let ComfyUI talk to a remote worker that runs LTX‑2, so your local Windows box just handles the graph UI.
What this looked like in practice:
- Install a connector/extension in ComfyUI (the one I used labeled itself “WaveSpeed” in the Manager list). After install, a new set of nodes appeared for remote execution.
- Authenticate or point it to a worker endpoint. Mine used a dashboard key. Setup took a few minutes.
- Swap the local LTX‑2 loader/sampler for the WaveSpeed equivalents. Same prompts, same graph shape, just different nodes.
Skip the setup headaches: Test LTX‑2 instantly on WaveSpeed — no local GPU, no driver juggling, just enter your prompt and start rendering.
If you’re curious, check the connector’s official docs for current setup steps. I wouldn’t rebuild my whole workflow around this, but as a no‑CUDA path, it was refreshingly boring, in a good way.
Related Articles
GPT-5 Model Versions Explained: From GPT-5 to GPT-5.4

How to Remove Sora Watermark: Best Methods

GPT-5.4 for Developers: What the Leaked Signals Mean for AI Workflows
SkyReels V4 Use Cases: 6 Ways Creators Can Use It Right Now

GPT-5.4 Release Date: What the Signals Say
